Upgrading My Audio & Video Conferencing Platform
For years I have been at the mercy of whatever audio and video hardware happened to be available in the system I have been running at the time. When I worked on my laptop a lot, I would use the built in mic and the webcam in the display for video calls. Later I decided to use a headset with attached mic which improved the quality a bit, at least as far as audio is concerned.
For the past two decades I have been working remotely, which implies a lot of online audio and video calls. COVID-19 did not help. So I decided I needed an upgrade - especially considering I did not even have a webcam on my Mac Pro (I do have one on my laptop but it is not convenient to switch computers when being called online).
The specific solution I arrived at is not the most cost effective; definitely not the one I recommend as it has been a lot of trial and error to get to this point. Also, there is a point where the cost to gain an incremental improvement is disproportionate to the improvement. I crossed that point, but in part I did not incur a direct cost as high due to the fact that I re-tasked some of my existing photography gear.
Audio
I will be discussing audio and video separately, since they mostly do not overlap, except for one scenario I will elaborate on later. Let's start with audio. Below is a short clip from an Acer Aspire 5733-6463 laptop using its built in microphone to record audio. A recording made locally is the best possible you will sound on a given device, as compression due to network conditions by the conferencing application will only further degrade the audio, as well as the output equipment of the receiver. Therefore the quality of the audio clips is the best you can expect from similar conditions and hardware (excluding my voice of course - you may have a beautiful voice). Also, for now I am ignoring the effect of the end user's output device in regards to feedback and echo.
When depending on the internal microphone of a laptop, many users will experience additional noise coming from the mechanical hard drives (older or cheaper models - new models and high end laptops use SSDs which are dead quiet) and fans spinning up (all laptops suffer from this). Since these mechanical devices are embedded in the same mechanical chassis as the microphone, the vibrations and noise get transmitted quite profoundly as is evident by the clip below where I made sure the laptop is not idle.
Moving on to a different laptop with no mechanical hard drives, the MacBook Air 2013:
High end laptops, especially from Apple, specifically the 2019 MacBook Pro 16, have much better audio quality from their internal microphones. I have the slightly older MacBook Pro 15 2018 model, but it is still a big improvement over the MacBook Air from 2013:
To improve audio quality beyond this you need to get physical separation between the microphone and the computer. A first attempt would be a combo headset with boom mic, like my old Microsoft LifeChat LX6000 headset:
I personally feel the quality is worse than the MacBook Pro above, but better than the MacBook Air from 2013. The boom position is important, putting it right in front of your lips do not produce good results. It does however completely solve any feedback and echo issues you might otherwise experience. I also did not find the on ear style very comfortable. Admittedly this is an older microphone, and there are better models such as the Jabra Evolve 80 (no personal experience but the specifications and reviews seem to imply it is pretty good).
So what did I do? I am not going to perform individual tests of each subcomponent of my setup, I am just going to show the final result.
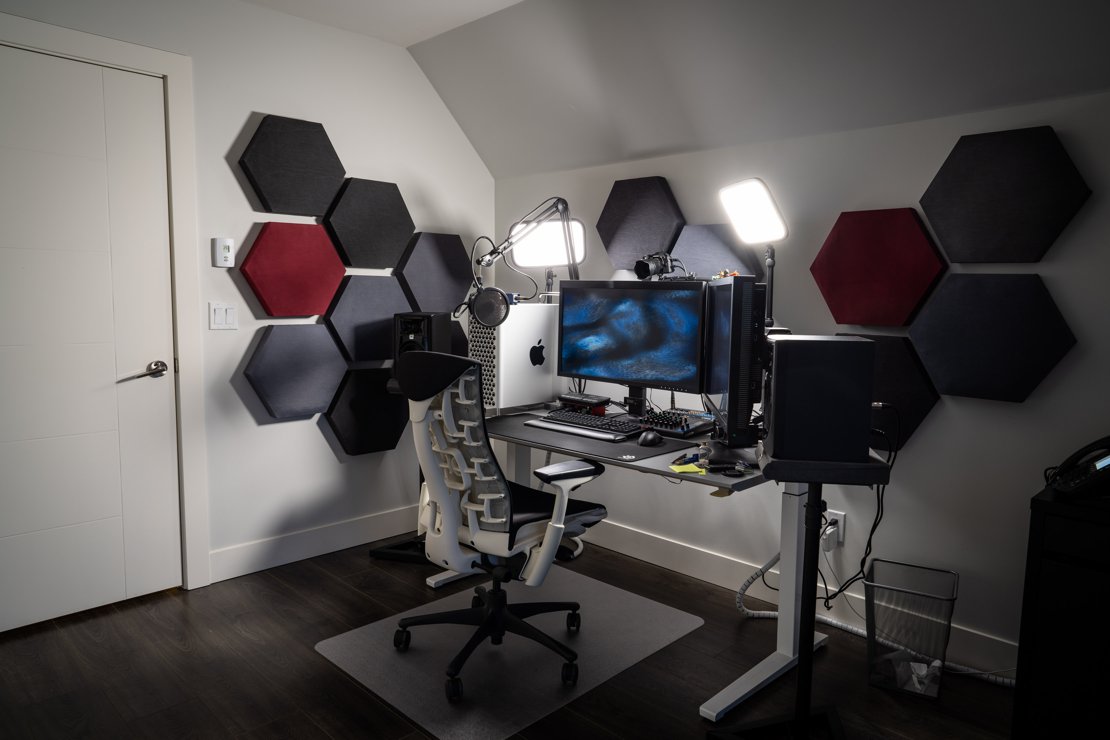
The Røde Procaster is an XLR condenser microphone, meaning it is less sensitive than a dynamic microphone. It therefore is slightly better suited to my office where I have less control over background noise than say a studio. That said, it needs a lot of gain to be effective, so the Cloudlifter CL-1 is an in line preamplifier that boosts its signal using the 48V phantom power delivered by the Yamaha MG10 audio mixer. That mixer both powers the cloudlifter, and allows me to have control over bass, midrange and treble frequencies, as well as the ability to add some compression and a high pass filter. The MG10 is a 10 channel mixer, a total overkill, however the MG06 model does not have a compression function which I wanted. The MG10 feeds its line out to the Focusrite Scarlett 2i2 audio interface, which is in essence an ADC (Analogue to Digital Converter) converting the analogue XLR signal from the mixer into a digital signal to be passed on via USB-C to the Mac Pro. With a standard USB microphone you do not need any of the components I mentioned as everything is built in to the microphone and you have no or limited control over it. Finally, going back to the microphone, it is mounted on an Auray BAI-2N Two-Section Broadcast Arm (I used to have the Røde PSA1 arm but it is not high enough to reach over my monitor). The microphone itself is mounted on a shock mount and an external pop filter.
This got me great audio, however there was still one major problem. My office has laminate flooring and empty walls, translating into me sounding like I am sitting on a toilet with all the echoes reflecting off the hard surfaces. The solution to that is simple but either expensive or time consuming - you need to introduce sound absorption material. A low budget solution might be as simple as decorating your office - hang some thick curtains in front of the windows, add one or two padded sofas or couches, perhaps a small floor mat, and a bookcase (with lots of books) also helps a lot. If this is impractical, or if you want the best possible acoustic treatment you have one of two options. First is to contract someone that knows what they are doing like Greg from HiFi Centre in downtown Vancouver that would probably suggest something amazing like Vicoustics - have him install it, pay the ticket and be done with it knowing it has been done right the first time. Alternatively, if you are a bit budget conscious or a DIY-er, you can consider building your own panels. Do keep in mind it will probably be less great than the solution I first mentioned, so be prepared to do a lot of reading, research and accept chances for failure.
I decided to go down the road of DIY simply because of cost and the fact that I had all the tools to make the panels myself. Here is the audio of me clapping my hands in my office before any treatment, but with the audio equipment I last detailed (the Røde mic):
And here is the audio in the treated room:
The difference is quite stark - there is almost no echo after the treatment, at least, it has been drastically reduced. How did I do it you may ask? Simple - two weeks of hard work ;)
Panels
Here are the panels:
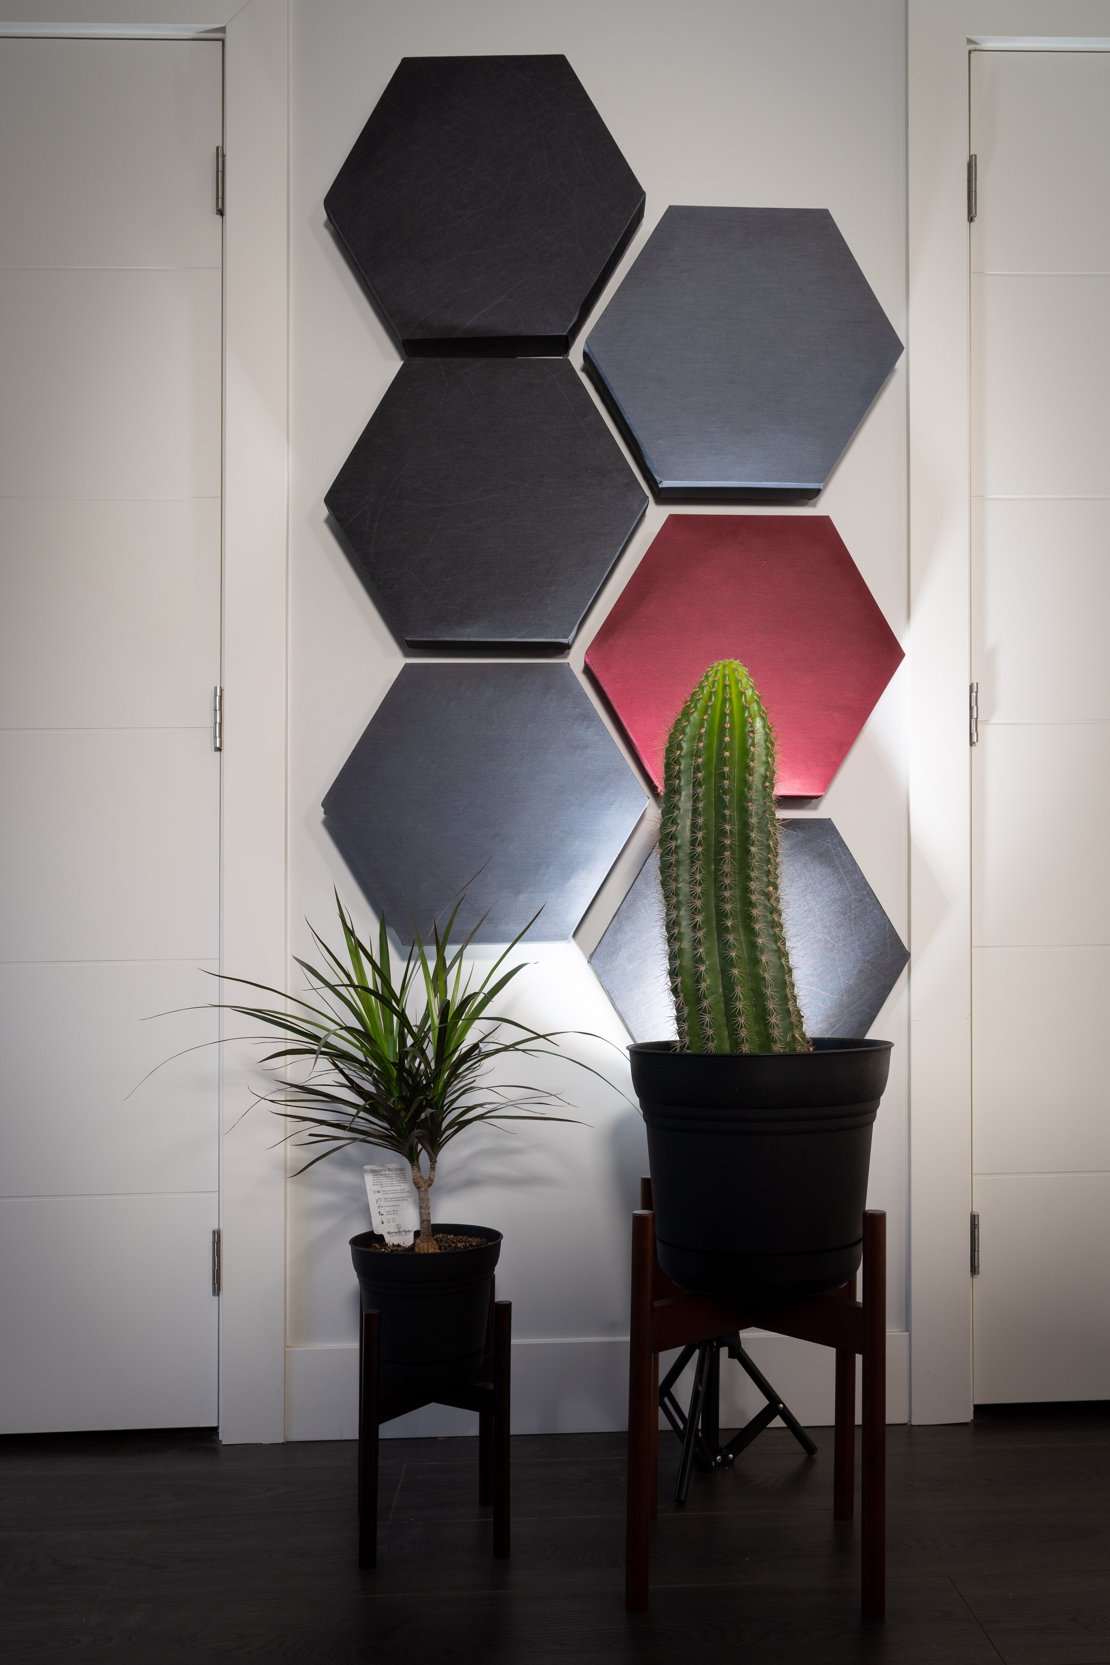
I made 29 of these hexagons; the idea behind the pattern was simply geometric - I can stack them in interesting ways to fill irregular open spaces unlike a large rectangular panel. Also, if bees make hexagons, then hexagons are awesome - and some dude even took some time to write some simple math to prove this.
I started with some good quality 12mm birch plywood I got for a previous project (once again from the great guys over at WestWind Hardwood). I used the bandsaw to rip them to 63mm wide strips of length 230mm. Each hexagon required 6 strips, each with a 60º mitre I also cut on the bandsaw and refined with a hand plane. 29 panels required 174 of these strips... That translated to roughly one and a half 5ft x 5ft sheets of plywood (I could fit 6 x 11 per half sheet so I had some offcuts). Once cut and planed, I sanded all the edges as they were quite sharp and would have cut the fabric.
Next I laid 6 strips end to end with the longest side up and used masking tape to join the ends together tightly. I flipped the strips and used wood glue inside all 6 joints. Being careful I lifted the end and rolled the segments together and flipped the hexagon by 90º to lie on its side. The last piece of masking tape pulled everything together and the excess glue was wiped off. After 24 hours they were properly set and rigid. As a little bit of OCD relaxant I drove one nail on each vertex to secure the segments a bit more.
With the frames done I could move on to the most important part - the sound absorption material itself. After some careful deliberation I decided to go with Rockwool SAFE'n'SOUND commonly used for insulating interior walls. It is 76mm thick, and each pack has 12 sheets of 387mm x 1194mm. I could get approximately 34 hexagons out of this amount so one pack was adequate. The material is not hard to use - easy to cut with a bread knife or fine toothed saw, however it does leave small splinters in one's hands. After a bit of work I managed to get 29 hexagons cut out and fitted inside the wooden frames.
Next up was the finishing fabric. I needed something acoustically transparent but still dense enough to not be see through. I settled on some fabric that was light weight and could be dyed. With the help of someone who knows more about Pfaffs and Brothers than I do, the fabric was cut to size, edged with an overlocker and dyed with black, gray and red (three different batches). After some ironing I used a staple gun to fix the fabric in place, and a hot glue gun to make sure the folded bits on the rear side was neat.
Last step was mounting them on the walls via two nails and two corresponding holes I drilled in the top segment of each panel. Each panel weighs 1.1kg so they are not too heavy to be mounted on drywall directly.
Video
Once audio was handled, I could move on to video. As I mentioned, I did not have any webcam when I started this project. I had the option of a high end webcam like the Logitech Brio however that was out of stock everywhere. It is by far the simplest as you would simply connect it to USB and be done with it. That said, it still has one problem - it uses a small (1/3") sensor - similar to the one in an iPhone 6 - 4.8mm x 3.6mm. Even though they advertise improved dynamic range and 4K, the quality is still limited to what a small sensor can produce. For most people that would not be an issue, but I had another idea in mind.
Since I am an amateur photographer I have a couple of ILC (Interchangeable Lens Camera) cameras lying around. One in particular seemed well suited - the Olympus OM-D E-M1 Mark II with a 17mm F1.2 lens (34mm eq.). The problem with using an ILC camera with a computer is that you cannot get the video recording via USB. You can get live view from some manufacturers (like Olympus), but you cannot use it as a webcam. Many manufacturers introduced proprietary software during the COVID-19 pandemic to help people use their ILCs via USB as a webcam like Canon and Fujifilm, however these solutions could be difficult to configure and might require additional software like OBS or Wirecast. I have not tried these as I completed my setup before any of these utilities were available.
The standard way to connect an ILC to a computer is via HDMI. However, even if your PC or Mac has an HDMI port, you cannot connect your camera to it as it is an HDMI "out" port - meaning your computer can only send out signals to a monitor, it cannot receive HDMI signals on that port. So you need to get a video capture card like the Elgato Cam Link 4K. This simple device allows you to plug the HDMI cable from your camera to the device, and the device plugs in to the USB3 port on your computer. The computer will see the camera now as a USB webcam.
Not any ILC camera will work for this. There are a couple of considerations you need to take before going down this route:
- The camera must have an HDMI output port.
- You need an HDMI cable that connects to both the camera and the video capture device.
- The camera must have a "clean" HDMI output signal, meaning a way to configure the video over HDMI output to not show status indicators like battery level etc. An easy way to test is to connect your camera via HDMI to a TV monitor or computer monitor and see if the output is free of these indicators.
- The HDMI output must support 720p or 1080p. 4K should also work if the video capture card supports it.
- Make sure the HDMI output from the camera is not HDCP protected. The user guide usually mentions this.
- Ensure the camera can be configured to not automatically shut down after a fixed period of video output. Some cameras like the Canon 5D will turn off the output after 30 minutes and cannot be reconfigured so they will not work.
- You will need to find an AC adapter that can power the camera as most cameras will drain the battery within 60 minutes when using it to live stream video. Not all cameras have AC adapters that can power it from the wall outlet. Specifically, my Olympus does not have this option unless you purchase the very expensive vertical battery grip. So I settled on an obscure 3rd party part.
- You will need a wide angle lens especially if you are constrained for space.
I went down a different route mostly because the Cam Link 4K was not in stock anywhere when I looked. I found the Blackmagicdesign ATEM Mini Pro briefly in stock so I grabbed one. This is not 4K compatible, however it does support up to 4 cameras @ 1080p output and switching between them. It allows for transitioning effects, chroma keying and overlays. I do not see 4K as a limiting issue right now as 1080p is more than enough for a very professional video feed. The benefit of additional cameras and effects outweigh the lack of 4K at this moment for me. The ATEM Mini Pro connects via USB to the computer, and all applications see it as a webcam.
Introducing a video capture card introduces a problem with audio - if you leave your audio settings as is and try to perform a video conference, the chances are very big that your audio will be out of sync with the video feed. This happens because ILC cameras delay the video feed by a couple of frames due to internal processing, meaning your audio usually is ahead by a couple of video frames. The easiest way to fix that if you use the ATEM Mini Pro, is to simply hook up the output from the mixer to the camera mic input, and then set your audio input source on your computer to be the ATEM Mini Pro, as the audio will piggy back on top of the HDMI feed from the camera through the ATEM Mini Pro over the USB to the computer. Since the audio is processed with the video inside the camera, both will be perfectly in sync. Alternatively, the ATEM Mini Pro just received an update to delay the audio up to 8 frames in software if using one of the two audio inputs on the device. This still requires you to split your audio signal from the mixer to go to the Scarlett (in my case) for when you just want to use the mic without the camera being on, and using the audio feed through the ATEM when using the video feed.
I found that I had electrical noise issues when doing that, so my solution was to get a small XLR switcher. The idea is to feed the input of this switcher with the output of the mixer, and the one output from the switcher goes to the Scarlett and the other to the camera. Unfortunately I still experienced noise that went away when I physically disconnected the Scarlett when the audio is routing through the camera, implying some sort of ground loop. When I opened up the switcher, I discovered to my horror that it used a 4P3T switch. Each XLR plug has 3 wires, ground signal - and signal + (they support balanced connections). So with left and right channels, each output has 6 wires, or 5 as you can usually connect the two grounds together from a single source. A 4P3T switch can only switch 4 wires, so what they did was to hook up the ground pin of all 8 sockets together, and only switch the rest as per below:

This did not help at all - the only reason I wanted this switcher for was to isolate the ground loop. So I eventually found a 6P3T switch (seems like 5 is a superstitious number), and rewired the device to switch the ground as well. The knob is way too stiff, but functionally it is working fine - no more noise.
Further testing showed that the camera introduced more baseline noise than when the microphone went in to the Scarlett, so I just changed my configuration by feeding the output from the switcher to the ATEM Mini Pro MIC1 input. For some reason I have only ½ frame delay between my video and audio using this configuration, so no need to adjust anything. There is about 50% less noise this way - still slightly more than when I bypass the ATEM, but acceptable. Having my audio and video in sync is really important for a professional result, so I will sacrifice a slightly reduced noise floor for that.
With the ATEM I do not need any additional software, as all apps see the camera as a 1080p @ 59.94Hz source. GoToMeeting/GotoWebinar struggles a bit as it really only supports a 720p signal, however on macOS 10.15 it does work, albeit with a 4:3 crop - hence the need for a wide angle lens.
So after all this - what does my Olympus camera with its 4/3" sensor (17.3mm x 13mm) and 17mm F1.2 lens get me?
- Shallow depth of field which blurs the background optically (some apps like Skype has a software emulation to blur the background but it usually is not very good)
- Much, much wider dynamic range meaning fewer blown out highlights, better shadows, better and more accurate skin colour
- Less noise, therefore a sharper, clearer image is possible
- Great autofocus - the camera tracks me wherever I move in the frame
Another problem was mounting - this was easily solved via one of these cool mounts. It is not the most sturdy and finicky to make small adjustments, but it works.
Lighting
A good camera with poor lighting is much worse than a poor camera with great lighting. Since space is a premium, I decided to get two Elgato Key Lights. Marketed under their gaming category, this is actually not specific to gaming at all. It is a WiFi controllable LED panel that can adjust its temperature (colour) and brightness. It is just the right size to properly illuminate a person sitting at a desk. They attach to the same mount as the camera. I also have an LED hair light for background separation.
End Result
Below is a video from a MacBook Air 2013's webcam and built in mic - the way most people do videoconferencing.
Below is a video from a MacBook Pro 15" 2018's webcam and built in mic - representative of a modern laptop.
In my mind the video is actually worse than the MacBook Air 2013, this is mostly due to lighting differences as they were recorded on two different days. Below is the same MacBook Pro 15" 2018 model but with the Elgato Key lights turned on.
And next is what I get from my current setup.
Streaming
The quality of your video and audio feeds are obviously crucial - the old adage "Garbage-In-Garbage-Out" applies here as well. However, just before you run out to buy that 4K webcam for the 4K resolution benefit, do keep in mind that it is crucial to consider your target use for the setup. If you are going to use this for GoToMeeting or GoToWebinar, then there is no benefit to having any higher output than 720p as they do not support webcams above that. For Skype and Teams, 1080p is about as high as it goes right now. 4K will only benefit you if you stream via YouTube, so right now 4K really is a novelty. Also, the bandwidth required to stream in 4K is more than most people have access to, as the audience also need to have a good enough internet connection to stream that 4K which will require at least 25Mbps.
Lastly is compression - all conferencing applications apply some form of compression to the audio and video feeds. These compression artifacts will reduce the quality of your audio and video feed depending on the bandwidth available to you and your participants. So having a pristine 1080p output feed from an ILC camera and broadcast quality microphone might get squashed if your internet connection or your peer's connection is not sufficient to handle the data.
Conclusion
Would I recommend this setup for anyone? Absolutely not. For starters, a key component in this setup is the camera and lens. Together they are over CAD 3000. I had these at my disposal due to my photography hobby, so I did not have to spend extra on this expensive component. To get a shallow depth of field you need a fast lens and large sensor. A 17mm lens @ F1.2 on a micro four thirds sensor gives a similar depth of field than a 34mm lens @ F2.4 on a full frame camera. However a full frame camera usually is more expensive. At the end of the day you need a fast lens and large sensor, and that will be expensive.
The audio is definitely a huge step up from a built in mic, but so too is a CAD 70 USB mic like the Blue Snowball (just watch out for Amazon - right now they sell it for CAD 174 which is madness).
Here is what I recommend in order of importance for each category.
Audio
- Get either a lavalier mic like the Purple Panda or a USB mic like the Blue Snowball. Just make sure it can connect to your computer.
- Position the mic properly - not too far and not too close.
- Do not use the computer speakers to listen to the call, use headsets as this will eliminate feedback.
- Get some furniture in your office to reduce echoes.
Video
- Get good lighting. It can be from natural light next to a large window, or a desk lamp. Just make sure to front / side light yourself and do not backlight as that will cause all sorts of trouble. In other words, do not have your back to a window and the camera in front of you - it will never work. You need to turn around and face the window, with the camera located between you and the window.
- Get a webcam like the Logitech Brio. It is supposed to have better dynamic range which is much more important than the 4K label.
- Put some effort in to the background - with a webcam more will be in focus so people will see every detail of the room you are in. Make sure it is attractive and neat.
- Make yourself neat too ;)
Take note I have no personal experience with the hardware I mentioned except for those I said I own. They are based on user reviews, specification sheets and some assumptions.