Local Weather Station
As I alluded to in my previous blog entry, I had a basic problem - different weather stations giving me different actual temperatures for my local area. Now I get there are local variations within a town, micro weather is a real phenomenon. However sometimes the weather stations were out by more than 8°C. So I decided to take matters in my own hands - how hard can it be?
It started with this component:
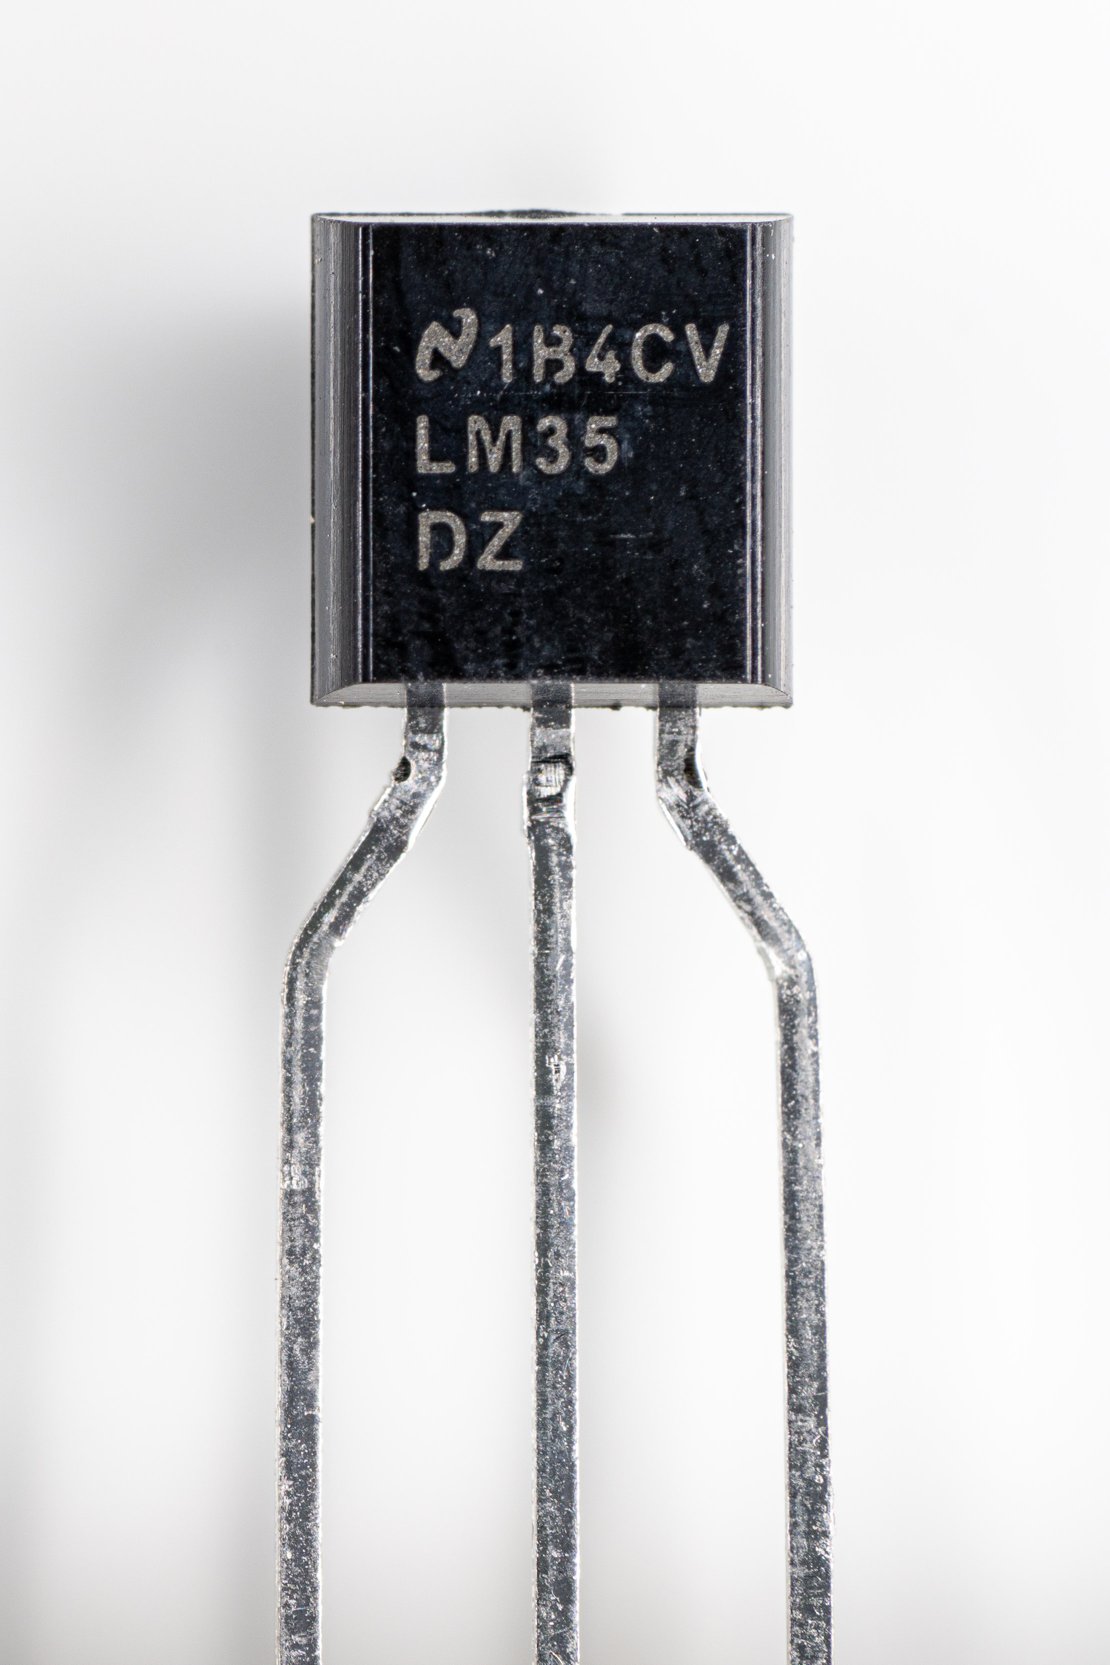
It is a precision temperature sensor capable of measuring -55°C to 150°C at an accuracy of approximately 0.25°C. The principle of operation is simple - attach two leads to +5V and ground, then the middle lead will output the temperature as 10mV per °C.
To power and read the device, I needed a small microcontroller as I also needed to log the data. The smallest I could find was a NodeMCU ESP8266 board. It has onboard WiFi, CPU, RAM, GPIO pins and most importantly - a built in ADC.
Once I got this connected to the LM35 and programmed, I recognized a problem. The output I got from the built in ADC sucked - I got no better than 0.5°C accuracy. This was no good. The built in ADC is 10 bit at 3.3V input. That means, a 20°C signal would be 20 x 10mV = 200mV, and then decoded into 3300mV/210/10 = 0.32 °C resolution steps. The other issue was that the moment the WiFi chip was enabled, the ADC had an offset error of about 12. That means, when I fed in 0mV to the ADC, with WiFi turned on it outputted 12 or 3.72°C. That also means it was out by 3.72°C over its range.
Next step was to ditch the built in ADC and get something much better - the ADS1115 16-bit ADC. Being 16-bit means I have a theoretical resolution of 2048mV/216/10 = 0.0031 °C - way beyond the accuracy of the sensor. Also, the ADS1115 speaks I2C which can be connected to the NodeMCU. Once I have done this and reprogrammed the microcontroller, I got very good results.
I took the system outside and it being -35°C, I noticed a small problem. The temperature never went below 0°C. I quickly figured out the problem - when you supply the LM35DZ with +5V and 0V, it cannot output values below 0. So I had to make a circuit change - by adding in two diodes in series I could offset the ground pin by approximately 1.1V. An 18kΩ resistor was added to reference actual ground and together it lifted the ground pin by 1.1V above ground. See this article.
Some additional code changes later, and I had a working negative reading. I tested this by hooking up a 5V USB power supply to my outside wall plug, and putting the electronics in a plastic bag to protect it from rain. I tied this about 2m from my house, about 1m above ground.
Unfortunately the next morning I saw a troubling trend. The temperature was dropping steadily during the night as expected, but the moment the sun rose, the temperature would shoot up more than 12°C in two hours time. Clearly actual temperature did not rise that fast. Some research later and I realised I needed to shield the sensor from direct sunlight. I relocated the sensor further from the house, next to a tree. This helped a bit but temperatures were always too high during the daytime.
Time for a bigger plan. I eventually figured out in metrology people use Stevenson screens. It is nothing more than a clever wooden box that allows air to move freely through the container, but prevents light, rain, snow and other weather elements from entering. Since this is a wood box, and I like woodworking, I decided to design and build my own.
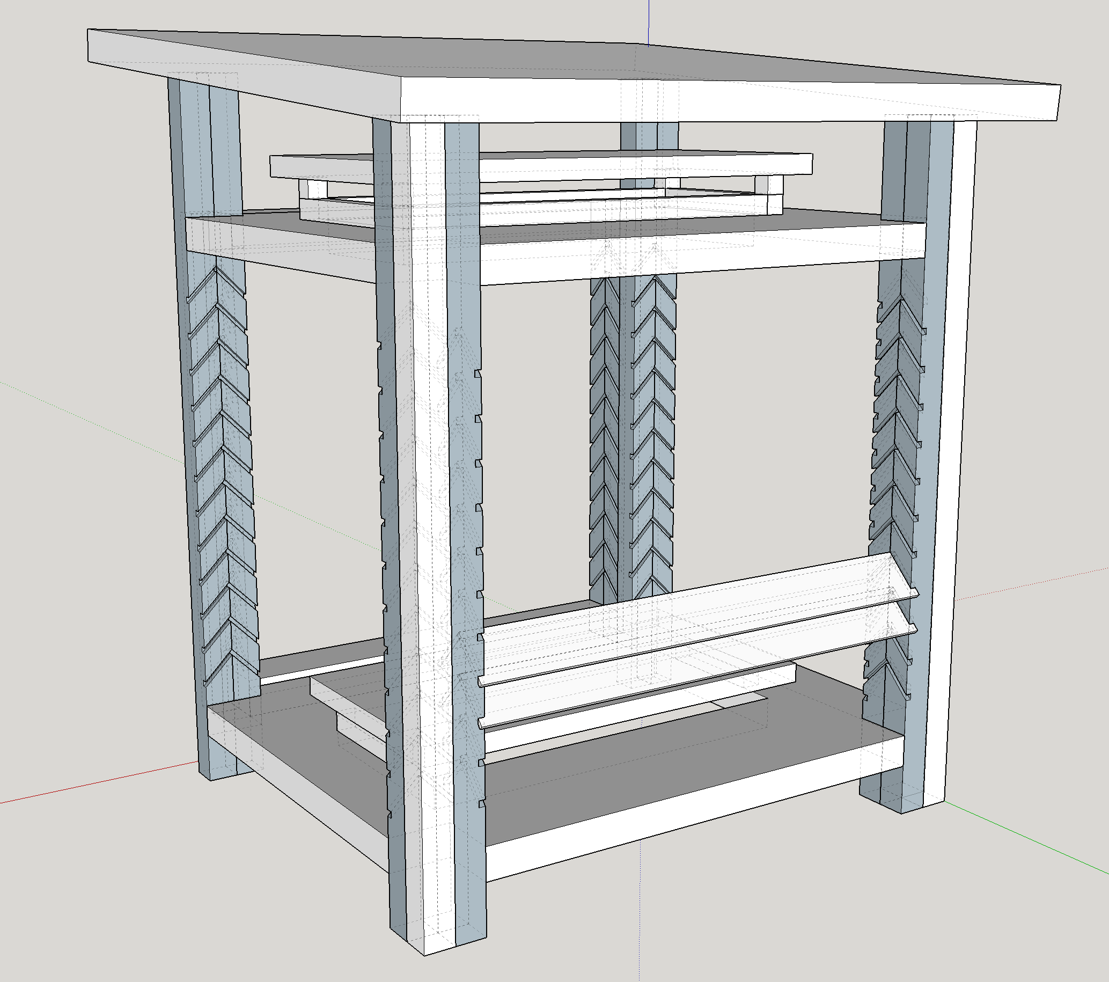
Only issue is, this is not a trivial box to build. It has 112 slats and 112 dadoes. And those dadoes are at 45° angle. So after a couple of weeks working in a garage at -10°C, I finally managed to finish my build.
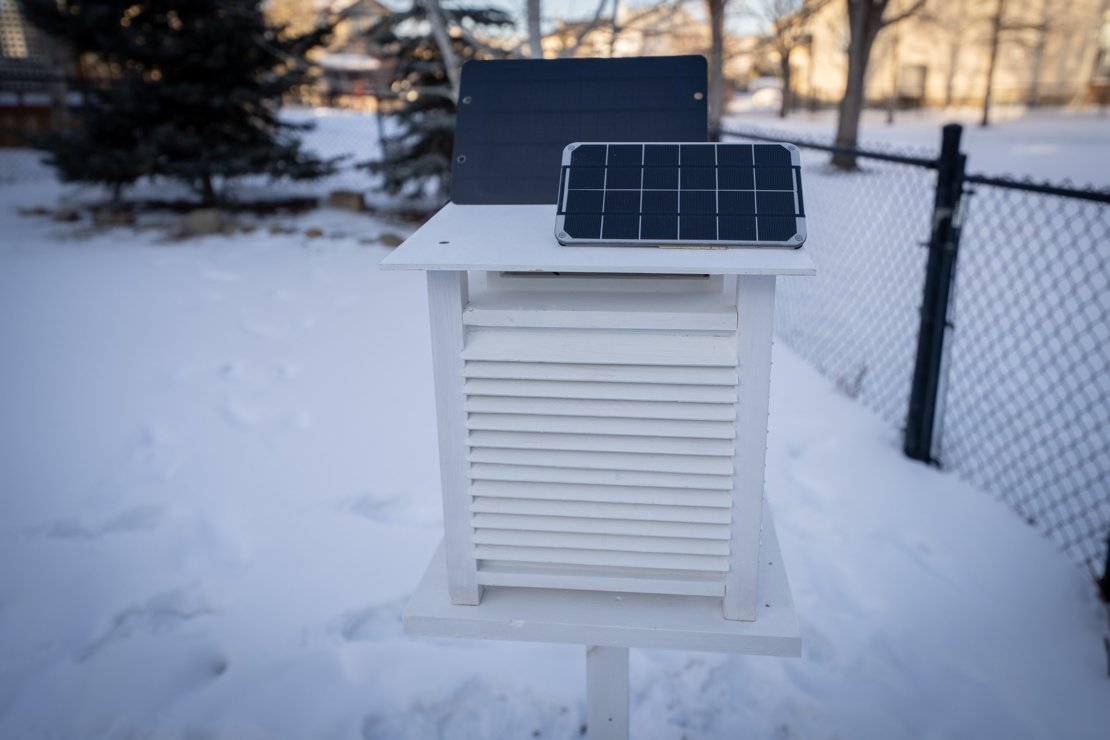
However, that left me with one last issue. The AC power supply won't cut it. I cannot run a wire over my lawn - just not sensible. So batteries it is. The design needs 5V, and the only battery that is good at low temperatures is Li-Ion / LiPo, but they usually top out at 3.7V. So I needed a booster circuit. Enter the PowerBoost 1000 from Adafruit. It takes in a range of voltages such as 3.7V, and outputs regulated 5.2V @ 1A. Last thing is to recharge the batteries. For that I got a 6V 3.5W solar panel, and the charging circuit BQ24074. It takes the output of the solar panel, connects to the Li-Ion battery, and outputs power from the battery or from the solar panel if possible. Since it does not have a fixed 5V output, the PowerBoost 1000 is connected to the output of this charger, and that regulates the output to a stable 5.2V.
And you guess it - I hit another snag. It gets down to -40°C here, and you cannot charge Li-Ion / LiPol batteries when the temperature is under 0°C. The further you are under 0, the more you physically destroy the batteries by trying to charge them. So the charger circuit allows for a 10kΩ NTC (Negative Temperature Coefficient) thermistor to be connected to measure the temperature and stops charging if it is too cold. But I do not want it to stop charging when it is cold as it can be cold for months on end. So I came up with my last idea: I got a small thermal blanket and a dedicated 5V solar panel, connected to the thermal blanket. Idea is that as long as the sun shines, it generates enough power to warm the blanket, which is wrapped around the Li-Ion batteries and the thermistor. If the solar panel can heat up the pad enough so that the temperature is above 0°C, the thermistor will allow the charging circuit to charge the batteries.
And here is the end result of me trying to get a tiny temperature sensor working reliably:
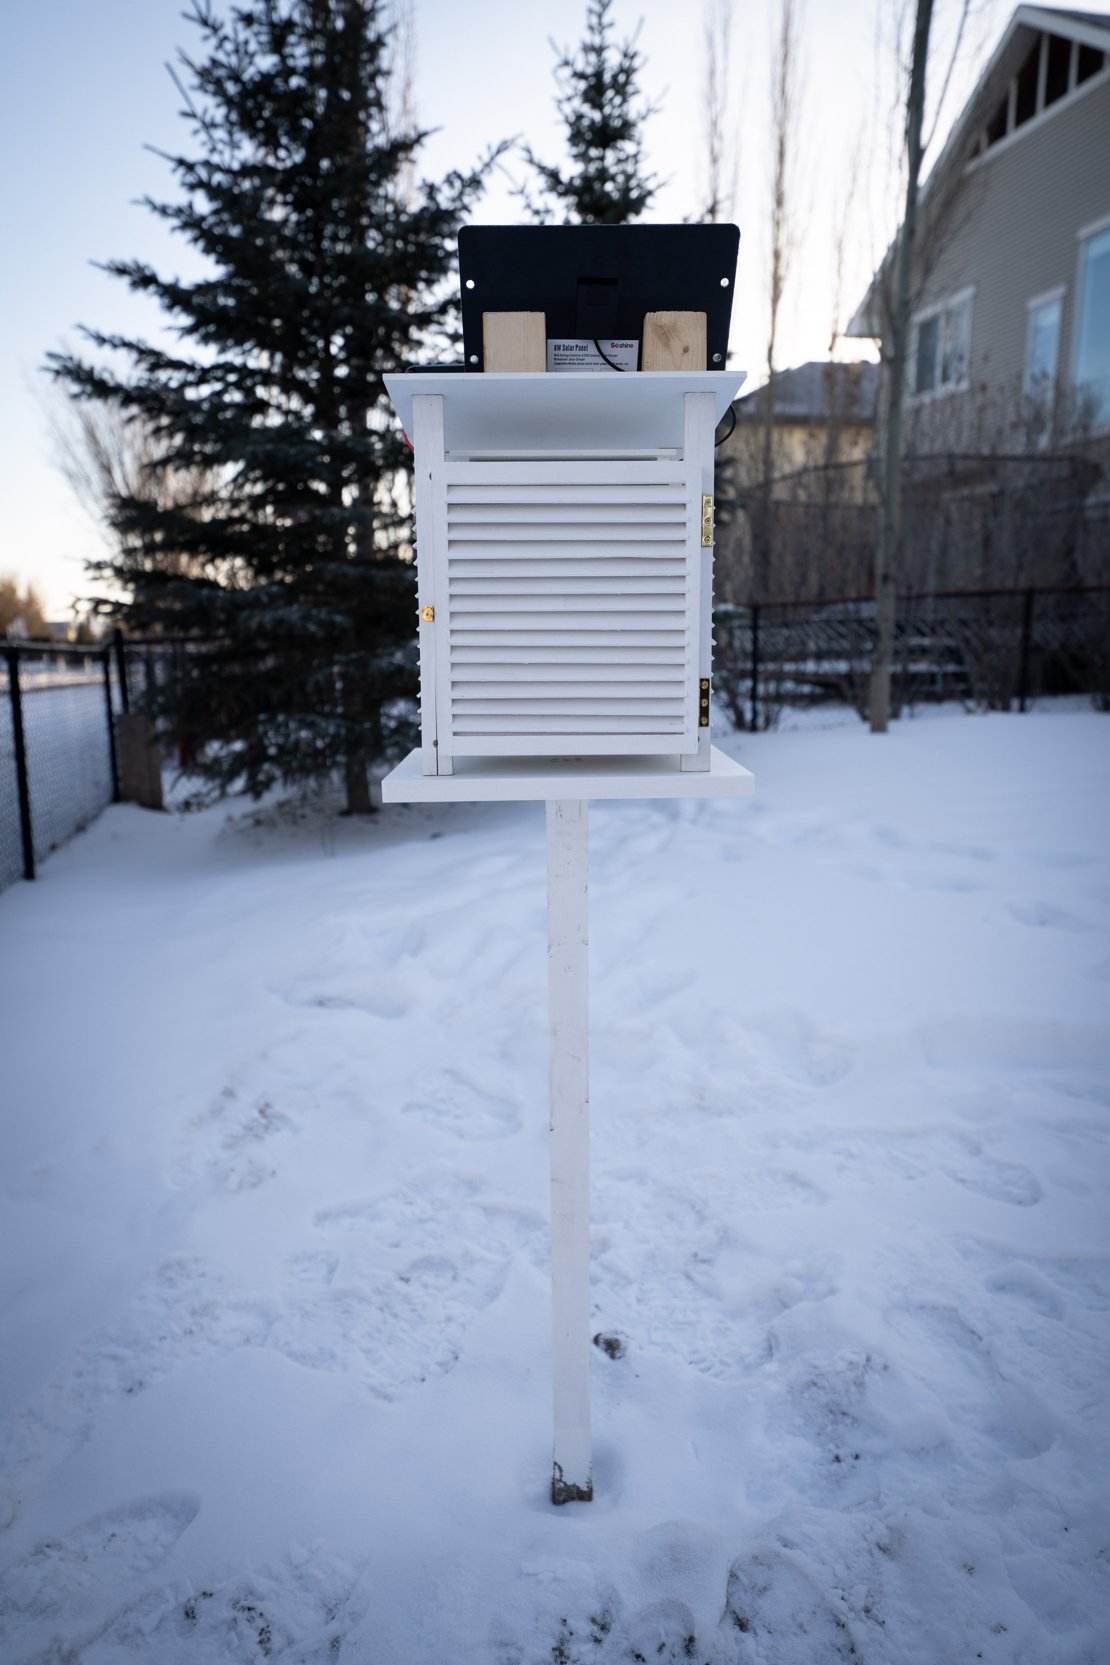
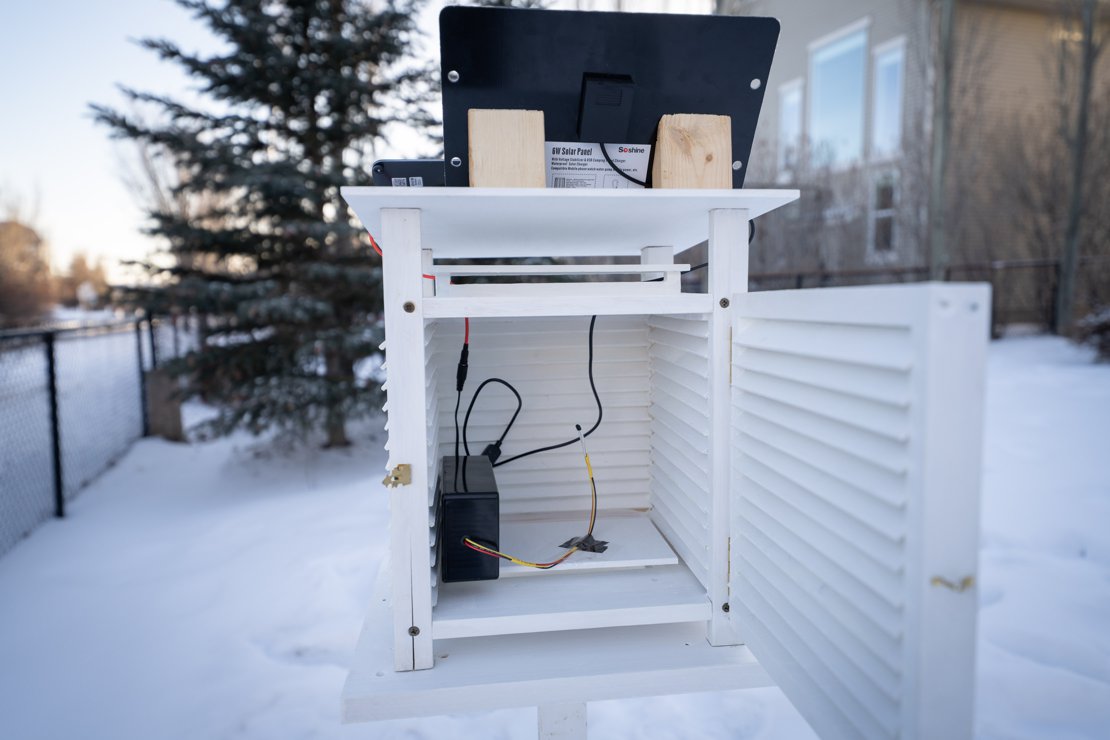
Oh and by the way, that LM35DZ in the first image of the article is the small black blob at the end of the thee wires in the center of the box. It is tiny - like a TO-92 transistor.
Do not ask me about the hole I needed to dig in frozen soil with my bare hands...
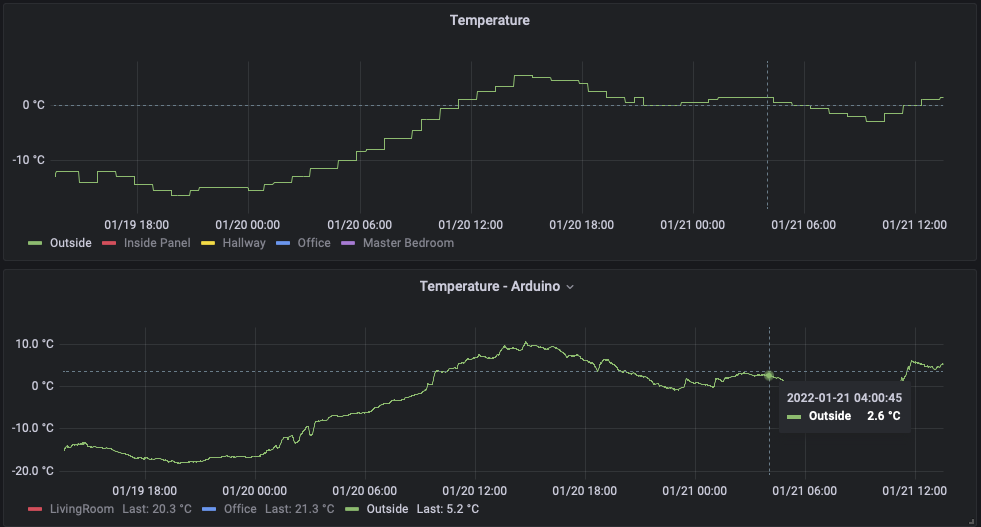
And to make things interesting, you can see the actual live temperature from the device here - just scroll down to Electronics.
I also wanted to show the results of the increased resolution compared to the output of my home thermostat. In the case highlighted here, the actual temperature outside was 2.6°C, yet the thermostat thought it was 0°C.
Update 2023-03-14 I realized later that the LM35DZ is not rated for negative temperatures (even though it worked fine). I replaced it with a LM35AH.