Most photographers know perfectly well how to focus a lens. Many of you even know how focusing works from an optics point of view. However, something that is very hard to find direct, detailed information on is how focusing works on modern 35mm DSLR and SLR cameras with Tilt/Shift lenses such as the Canon 17mm TS-E or 24mm TS-E (I use Canon equipment, but the Nikon equipment works identically to the Canon equipment from an physics perspective).
Many great sites exist detailing some aspect of Tilt/Shift lenses, such as Luminous Landscape, Cambridge In Colour and Harold M. Merklinger's articles. If you have the time and read through all those articles, and some more - then run some extensive experiments you might understand 95% of what you need to know. However, even after reading all those articles I still had a couple of nagging questions, such as: How exactly does focusing the lens affect the plane of sharpest focus; What is so special about infinity focus that all the rules of thumb tells us to focus at infinity regardless of the tilt, to have the plane of sharpest focus be horisontal, etc. Read on and I'll explain these issues and some more.
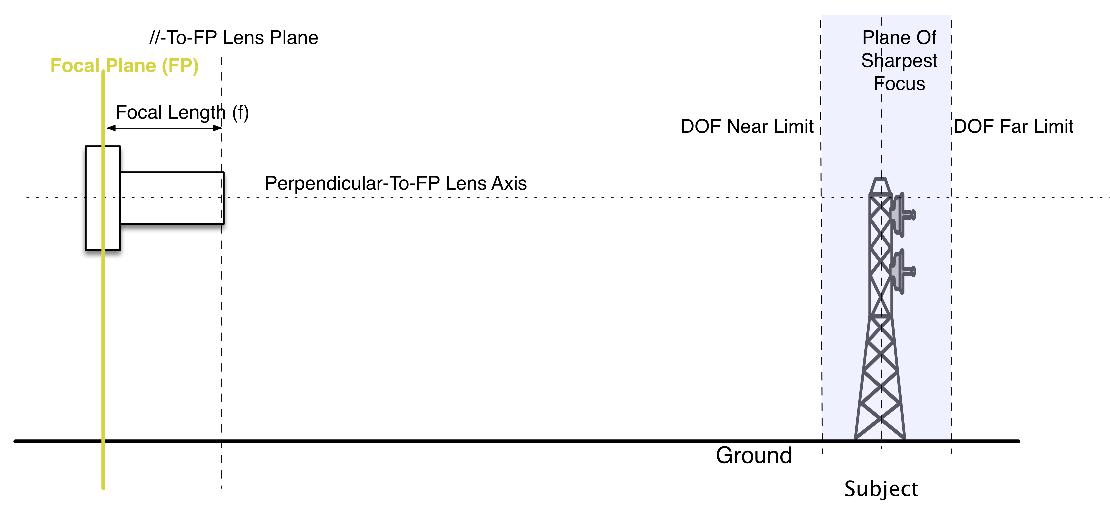
But first, a refresher course. When a camera is placed on a tripod (viewed from the side, as per below), and the Lens Axis (the line through the optical centre of the lens, perpendicular to the focal plane (CCD Sensor / Film Plane)) parallel to the ground, the focal plane will be perpendicular to the ground and in our case, parallel to the subject. Assume a standard prime lens with no tilt/shift movements. To focus on the tower you only need to turn the focus ring to the correct position to have the Plane Of Sharpest Focus aligned with the tower. To ensure the whole tower is sharp, the Depth Of Field is adjusted solely via the Aperture of the lens. The larger the aperture (such as F1.4) the smaller the DOF, and conversely the smaller the aperture (such as F22) the larger the DOF will be. The plane of sharpest focus and the near and far DOF limits have a very important characteristic; they are all perfectly parallel to the focal plane of the camera. Note that the DOF is not distributed equidistant from the plane of sharpest focus. For wide angle lenses about 70% of the DOF is behind the plane of sharpest focus, and 30% in front of it. For a telephoto lens this relationship approaches a 50%/50% split. When approaching true macro magnifications at 1:1 this split also approaches 50%/50%.
The way focusing works depends on the exact lens design, but typically in a modern SLR lens this is accomplished by moving a lens group move towards and away from the focal plane. When you focus at infinity the nodal points are closer to the focal plane; when you focus closer the lens group is pushed away from the focal plane towards the subject.
When a tilt/shift lens is used however, and some degree of tilt is applied things start to change dramatically. Lets assume the same setup as above, i.e. a side view on a camera tripod mounted, pointed towards a tower in the distant on the right, with a field of flowers in between. To get the whole scene in sharp focus will typically require you to stop down to F16 or even F22. As many of you know doing this is not ideal since we are entering the realm of diffraction, especially on higher density CCD's such as 15MP APS-C or 21MP FF sensors. Diffraction has a very bad effect on the image - it reduces sharpness. At some point softness introduced by diffraction is worse than softness introduced due to limited DOF. Especially when a point of interest is located both in the immediate foreground as well as in the distant background it gets hard to balance the DOF.
Enter Tilt/Shift lenses. As I mentioned, there are many good tutorials on how these lenses operate. This article will only address the issue of which variables affect which aspects of focusing. Look at the image below.
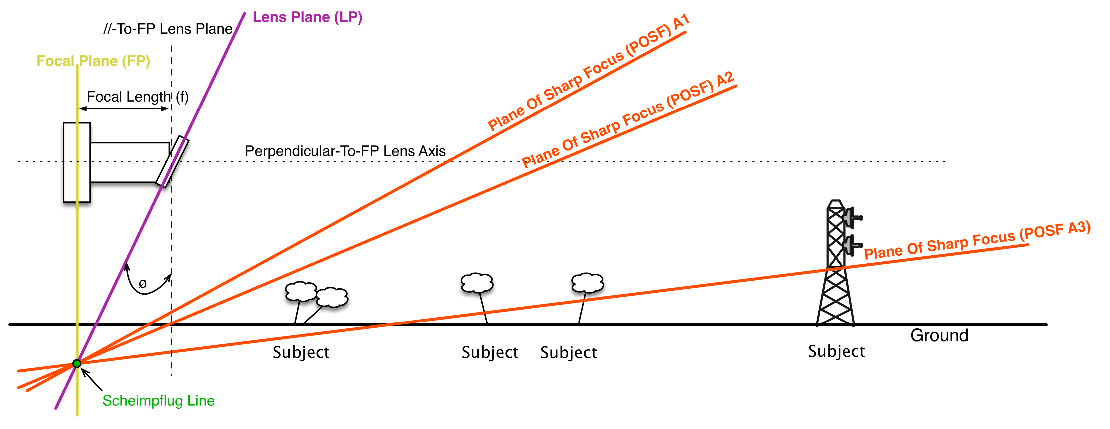
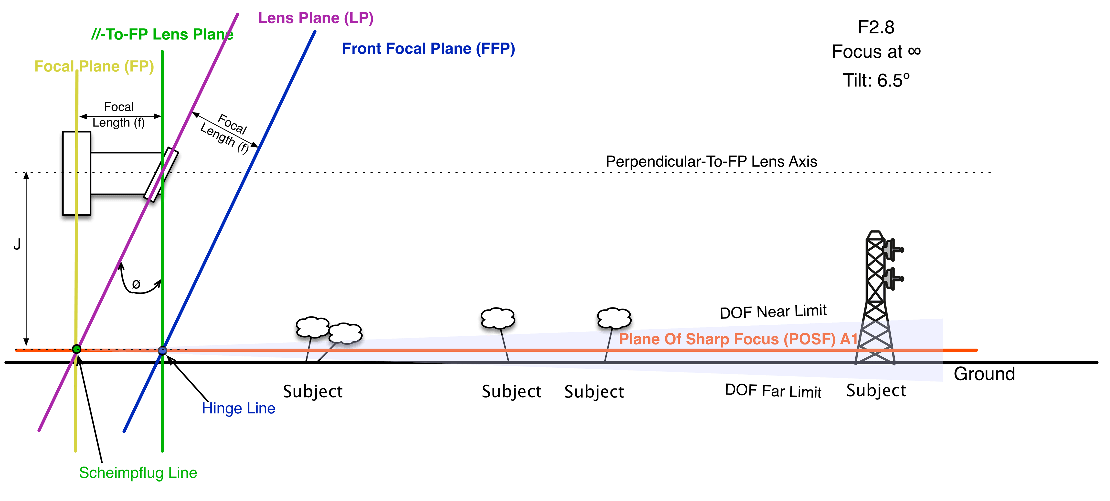
In this example we added some forward tilt (i.e., the tilt is applied downwards towards the plane we want to have in focus). On a typical SLR lens this is anywhere between 0.1 to 8 degrees. The moment the lens is tilted downwards the plane of sharp focus is no longer vertical. In fact, it slopes at an acute angle to the ground. To determine this line's position more precisely, two principles helps us out. The first is the Scheimpflug line. This line (in the diagram above it is represented by the green dot, as it is actually a line going in to the paper on the z-axis) is defined as the intersection of the focal plane line (yellow), the lens plane (purple) as well as the plane of sharp focus (red). Therefore any of the red lines represent the planes of sharpest focus. Since an infinite amount of lines can be drawn through the Scheimpflug line, they are indicated by lines A1, A2 and A3 as three random possibilities. As the angle Ø is modified by adding more or less tilt, the Scheimpflug line can only move up or down the focal plane line. It is therefore possible to locate the Scheimpflug line above or below the ground:
This is where most articles stop and leave the actual focusing up to you with some description of how to position the Scheimpflug line on the plane you want to have in focus, then to use an iterative approach to setting focus and tilt until everything on your desired plane is in focus. However I am going to go much further. The biggest issue that is clear to anyone with a basic understanding of Euclidian geometry is that one needs exactly two distinct points to uniquely determine its position and slope. If we can find another point then we solve the dilemma that any of an infinite amount of planes could be in focus once we set the Scheimpflug line (by means of tilting the lens).
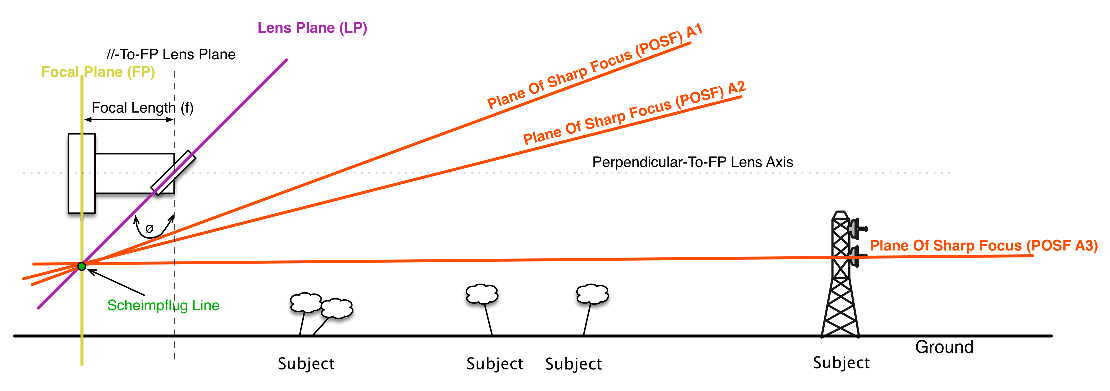
This other line is called the Hinge line, and is shown below:
The Hinge line is indicated by the blue dot, and is defined to be the intersection of the parallel-to-focal-plane lens plane (green), the front focal plane (blue) and the plane of sharp focus (red). The front focal plane is that plane parallel to the lens plane, but exactly one focal length distance away from the lens plane towards the subject. Since the plane of sharp focus has to go through both points (Scheimpflug and Hinge lines), the line's position is uniquely determined. The alert reader will be wondering how do we control this Hinge line since we already know how to control the Scheimpflug line (via tilting the lens)? The answer is via the focus ring. As we focus or tilt the lens, the hinge line moves. This complicates the whole focusing process since we have two variables (tilting and focusing - ignoring for now the third variable of tilting the camera itself), and these two variables affect both pivot points in a complex manner.
Tilt causes the Scheimpflug line to move up/down the focal plane line. It also moves the Hinge line up/down the parallel-to-focal-plane lens plane line in such a manner that the slope of the plane of sharp focus line is unaltered.
Focus causes the Scheimpflug line to move up/down the focal plane line. It also moves the Hinge line horizontally towards/away from the focal plane, keeping the Hinge line distance J constant (J is the vertical distance between the lens axis and the front nodal point of the lens). In the example above, the lens is focused at infinity, hence the focal length and distance to the front nodal point are the same. When focusing on a closer subject, the picture changes:
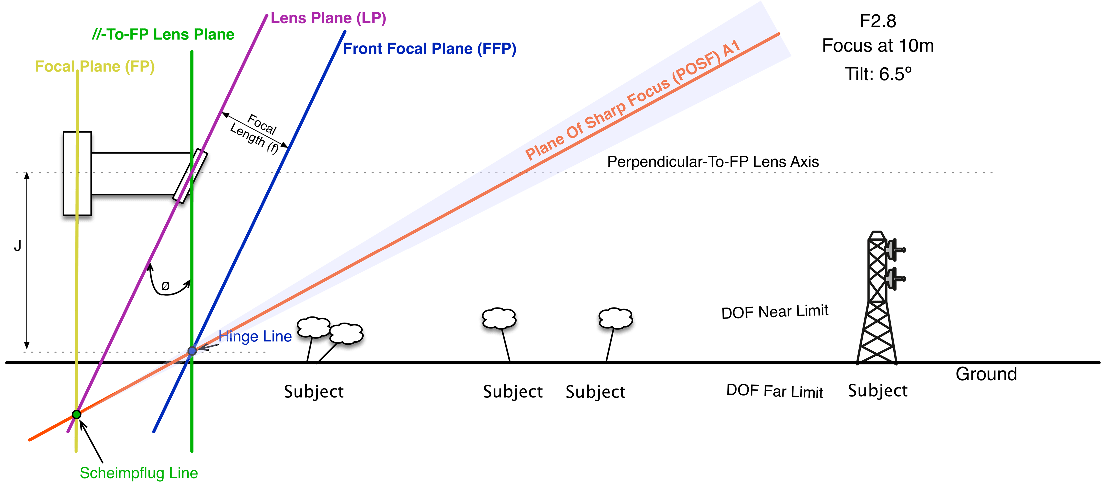
In this case the Scheimpflug line moved downwards, and the Hinge line forwards away from the focal plane, but J stayed the same since only the amount of tilt applied can affect the value of J. By focusing closer, we had to extend the lens barrel (sometimes internally, sometimes the barrel physically extends but the front nodal point of the lens group always moves outward when focusing closer, pushing the parallel-to-focal-plane lens plane forward, pushing down the Scheimpflug line in the process and tilting the line upwards). Visualise it by thinking not of the lens that moves forward, but the focal plane (camera) moving backwards. Since in this case the Hinge line is fixed, the Scheimpflug line has to move downward on the focal plane line as the lens plane line is driving it downwards.
Visually understanding the effect focus and tilt has on this plane is crucial to understand how to make adjustments when in the field. Randomly following some guidelines of adjusting tilt and focus repetitively is not productive. Understanding the effects of tilt and focus on the plane of sharp focus allows you to quickly and effectively set the correct values on your camera.
My technique is as follows:
- Determine J based on my subject and my equipment at hand (tripod, hand held etc).
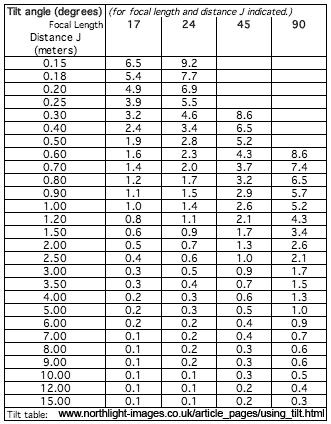
- Assuming my plane of sharp focus is to be horisontal (as is the case in most landscape photos), I read the amount of tilt required based on the focal length of my lens and the value of J. This information is readily available on the internet.
- I then dial in this amount of tilt to fix J.
- Next I proceed to adjust my focus to infinity. When the focus is at infinity, mathematically it can be shown that for a small tilt (maximum tilt on SLR lenses is typically 8 degrees which is small) when the front nodal point is the same distance from the focal plane as the focal length of the lens (the case when focusing on infinity), the hinge line will almost exactly be on the same horisontal plane than the Scheimpflug line - causing the plane of sharp focus to be horisontal as well. This does not apply when the tilt is large, such as is possible on large format view cameras.
- I then adjust the tilt / focus very slightly if required to compensate for measurement errors, looking at my Live View screen on both the far and nearest subjects of interest, ensuring both are acceptably sharp.
- I will then adjust my Aperture to ensure the vertical extent of my subject(s) are covered.
To elaborate on that last point, the effect of aperture on the DOF when a lens is tilted is shown below. When a lens is tilted the DOF is wedge shaped, with the apex at the Scheimpflug line. At F2.8 the DOF is quite limited:
Stop down to say F9 and this is how the DOF looks like:
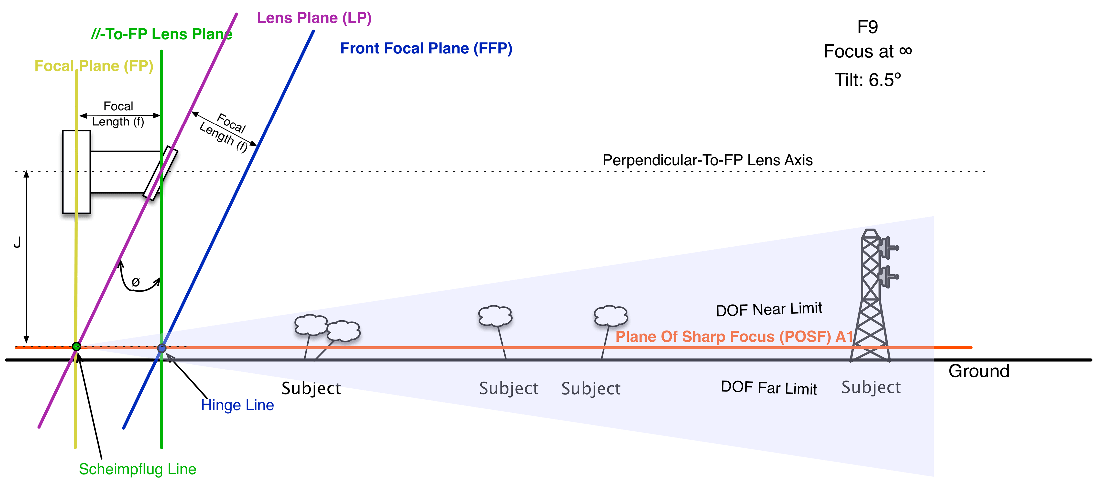
Notice the light blue shaded area has increased the further away from the focal plane one moves. In this case it is enough to cover the tower, hence rendering the whole scene sharp. Also keep in mind that the DOF as indicated above does not always have a 50%/50% split. This is only true for long telephoto lenses or macro magnifications. Since neither of those two are typical of tilt/shift lenses, it is important to remember that the front/rear distribution of DOF needs to be considered when placing the plane of sharpest focus. Typically when tilting down most of the DOF will be behind of the subject since tilt/shift lenses tend to be short focal length lenses. So sometimes - especially when no critical foreground detail is very close to the hinge line (or the closest point in view of the lens), it might make sense to raise the plane of sharpest focus a bit by tilting the camera a bit more or raising the camera from the ground. This will bring some of the lost rear DOF back up to cover vertical objects.
For completeness sake, I have linked to a very useful table for reading the amount of tilt to dial in for any given distance J. This table was created by Northlight Images based on Harold Merklinger's work.