480g Predator Aquarium
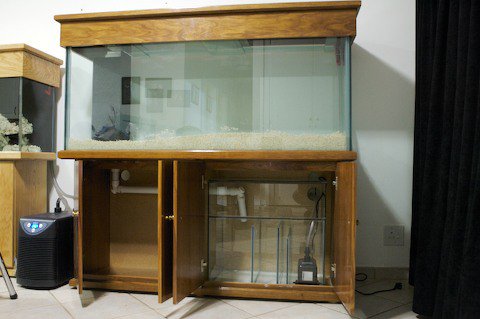
I always wanted to keep a Volitans lionfish, however they become quite large and obviously is not suitable for a reef aquarium as they would make a quick meal out of most tank mates. So I had one of two choices; either I get a dwarf lionfish that might co-exist peacefully with my other reef inhabitants, or I need another aquarium. Since I really was only interested in the Volitans lionfish, I decided to get a new 125g tank dedicated to non-reef safe fish.
This is what I bought:

On the left a picture of the 125g when I was busy setting it up is shown. It had a DSB to help with Nitrates, however it did not help. Seven months later and the algae just took over, as can be seen above. The Nitrates measured 300mg/L, whereas the Ammonia and Nitrates were both 0. This was partly due to the fact that I had a fluidised sand bed filter keeping the Nitrites down. However it was so effective that Nitrates started building up - and the live rock and DSB could not keep up with it.
This did not directly affect the fish, however it killed off all my snails, my bamboo shark as well as stimulating heavy algae growth. Clearly I had to choose. Either I had to let go of my eels and wrasses, or I had to upgrade.
The live stock load was not that heavy - I had a Volitans lionfish, two Moray eels, a juvenile Twin Spot coris, juvenile Dragon wrasse and Snowflake eel in the tank. The problem is that the wastes produced by these fish are enormous, and my equipment could just not keep up. So the upgrade option won... This tank was torn down and sold. All the live stock is now in the new 480g tank.
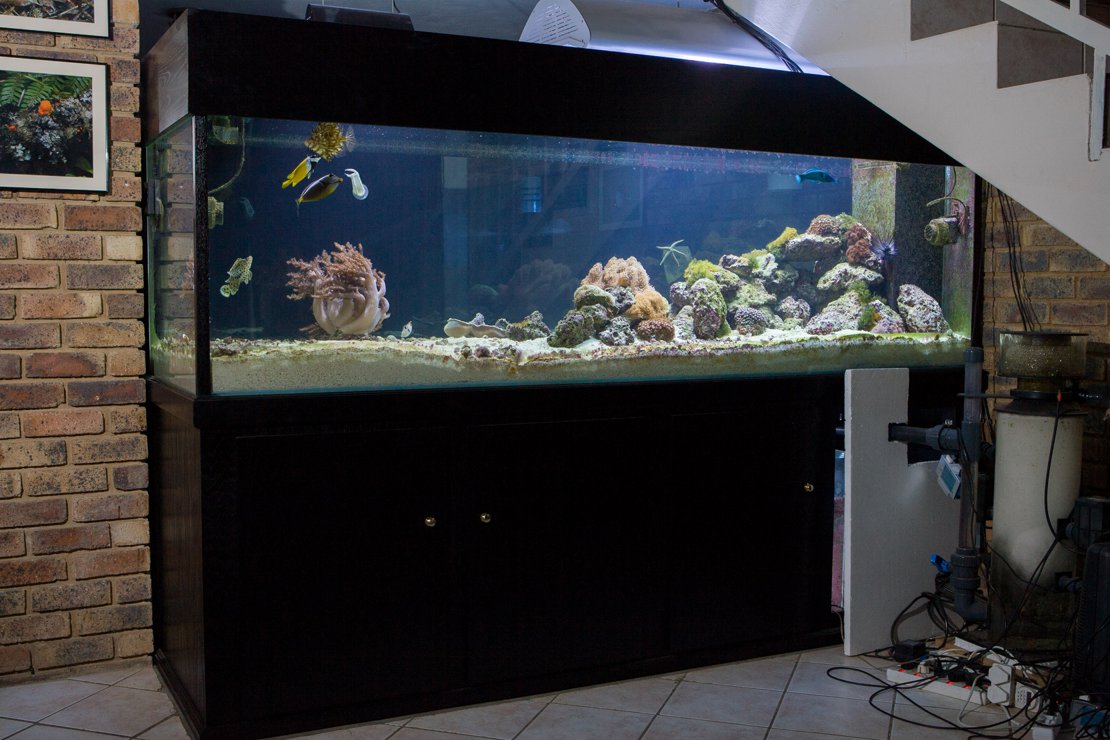
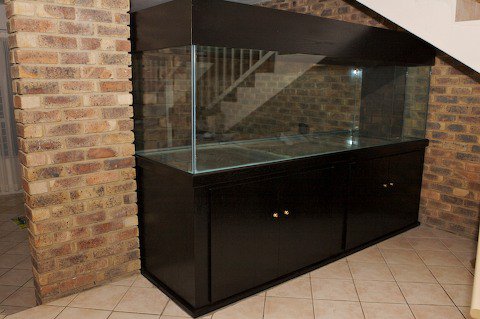
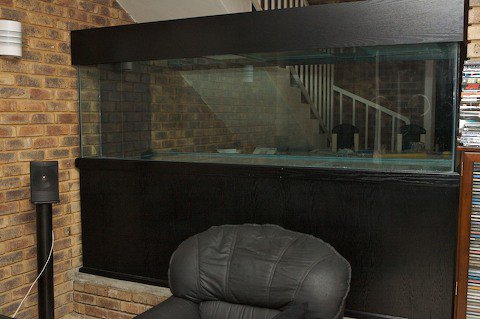
This time the upgrade would have to last for a long time, so I decided upon a 480g custom built tank. Since this is still a work in progress and I am still waiting for my Infinity light pendant, I can not neaten the wires until all the electrical wiring had been completed. Also, I have a cabinet on order to cover the skimmer, chiller and topup tank on the right hand side of the tank. For now I have a polystyrene cover to stop light entering the skimmer.
The idea with the aquascaping is to make it look like the drop-off zone of a reef, with a large open space for the fish to swim without any obstructions. The drop-off zone is darker than the rest of the tank.
Tank
The tank is kind of a sad story. Originally we had a small room divider between the living and dining rooms:
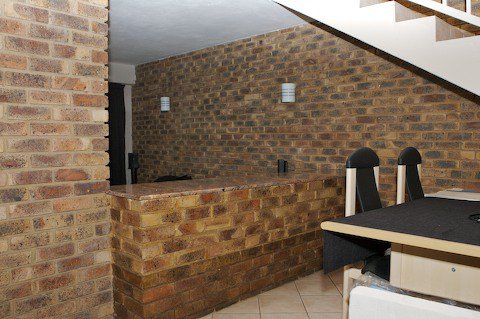
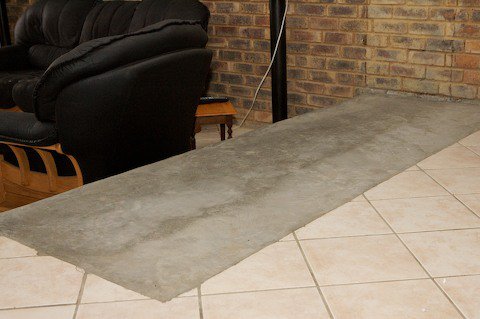
This divider was broken down and replaced with a slab of cement, as shown on the right. The original tank arrived the 4th of April 2007, and looked like this from the dining room and living room, respectively:
It took me two weeks to fill the main tank with water, since making 480g of RO/DI water is not a quick process. Eventually the tank was filled and had about 85kg of coral sand in it. I pre-mixed the salt, but since the plumbing was not yet done I could not complete the closed loop. We were on the night before leaving for a 10 day holiday in Namibia, so I had one Tunze Turbelle stream 6100 pump move the water in order to complete the curing of the 40kg of live rock I had in there. The idea is to have the live rock cure and the water parameters stabilise while I was away for 10 days.
Well, two days later I got an SMS informing me my power tripped. Since I was 2000km away, there was nothing I could do. I sent some people over to have a look, but that was when I got the worst call anyone can receive - all 480g of saltwater was laying in my living room...
It flooded my lightning protector, speakers, furniture etc. The tank cracked across the 2.7m length bottom panel from left to right... It was spectacular. That tank was built using 12mm side glass panels and two layers of 10mm panels at the bottom siliconed together. The stand was a 38mm square tubing frame. The stand did have cross braces to support the bottom of the tank, but with the moving the polystyrene became compressed and did not support the tank anymore.
The LFS took it back and built a new tank and cabinet for me (at their cost obviously). This time the tank used three 10mm bases, the bottom panel a single sheet and the other two strips of about 500mm wide panels all siliconed together. The tank has conventional cross bracing to support the side panels.
As I wanted this tank to fit in the space between my living room and dining room, I had it custom built to be 2.7m long, 0.8m high and 0.85m wide. The stand is obviously excluded from these dimensions. The new stand has a 50mm square tubing frame with a 2.5mm wall thickness and extra vertical support beams. I had to raise the tank by 15mm due to a non level floor.
Beneath the tank is two sumps joined by a modified bulkhead. I wanted two separate sumps so that I could use one for my equipment and the other as a refugium. Experience taught me if you combine the functions of both you will get hectic algae growth inside all clear pipes and on the equipment themselves. So by splitting the two I can light the refugium and block the light from the other sump containing the equipment.
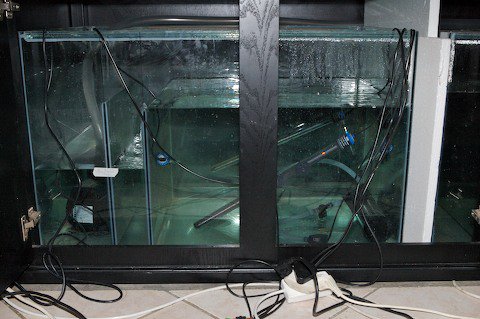
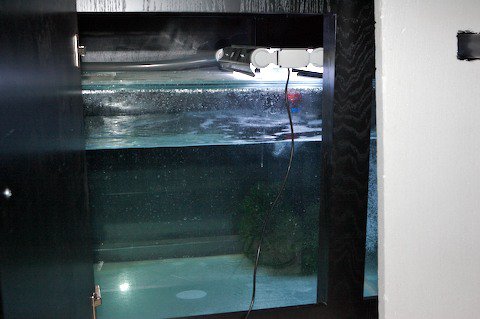
The sump on the top left contains my return pump, heaters, GAC reactor and topup unit. The sump on the top right has a ball of chaeto and a 2 x 24W T5 light fixture that is set on a reverse photoperiod. By joining the two sumps like this I also get rid of micro bubbles much more effectively than the usual up/down glass dividers. The sumps each contains 300L of water, so they increase the total water volume by 600L.
As far as the plumbing is concerned, below are some pictures of the return flow:
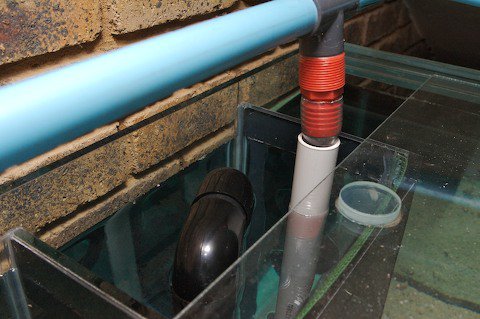
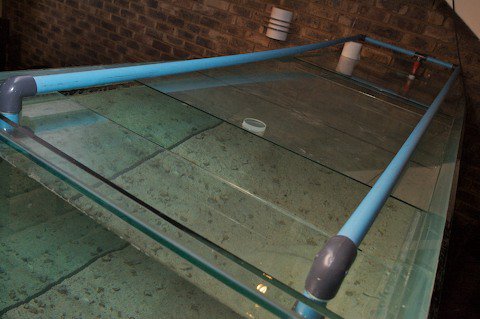
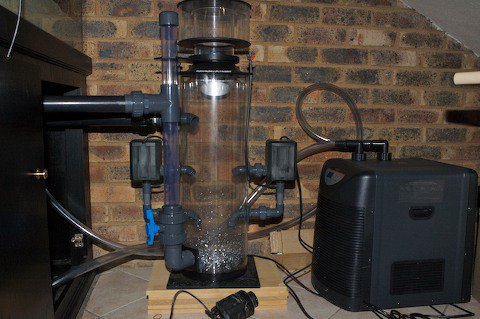
On the top left the overflow weir is shown. I opted for a single center overflow weir on the far side of the tank to make the tank look neater. A durso standpipe allows the water to be drawn to the skimmer and sump below. The return line from the return pump via the chiller runs through the white PVC pipe and is split in to two blue pipes, feeding the opposite side of the tank. This is visible in the picture top right, where the return lines are fed back to the tank. All these pipes are hidden by the canopy. On the left is a picture of the skimmer and chiller after I plumbed them in. These will be hidden from view by a small cabinet that will fit tightly under the staircase.
This time I was a bit more lucky, as the tank did not break in the first two days after me filling it and closing the loop. Unfortunately it did crack after three days. The two bulk holes in the overflow compartment are about 10cm apart from each other, and something - maybe the pressure of the bulkhead fittings - caused too much pressure and the bottom glass pane cracked between the centers of the bulkheads. I have been monitoring that crack ever since and it seems to stay where it is. There are still two 10mm glass panels above it that is intact, and even though it cracked it does not mean the glass does not still structurally support the water.
I am however very disappointed in the craftmanship of these two large tanks that both cracked, and will never use layered bottom panels again - they just do not work. A single 1" bottom panel would most probably have been a much better choice.
Filling it was another story. Obviously the second time around I was hesitant to just fill it up with saltwater, so I added my 350kg of substrate (120kg coarse crushed coral, 150kg fine crushed coral and 85kg coral sand), then added all the RO/DI water to complete the circulation loop. Once I was happy there were no leaks or cracks I started adding salt directly to the tank - in front of the Tunze Turbelle stream. I did this bit by bit, throwing in 100g at a time. At that time the temperature of the water was 14C.
For 528g of total water volume I was supposed to use a bit less than 3 buckets of salt - i.e. about 68kg of salt. For some strange reason I had to throw in 4 buckets - almost 100kg before my specific gravity was 1.024. Some people suggested the salt had not completely dissolved yet and went in to the substrate. After one month the specific gravity only went up to 1.026 - so that theory is not completely correct.
Lights
Originally I wanted to have two 120cm pendants suspended over the tank. After I performed the aquascaping, I realised the dropoff zone would look more realistic if I only use one pendant. So I ordered a Sfiligoi Infinity XR4 pendant that has 2 x 400W MH 14000K, and 4 x 54W T5 - two Actinic and two Aquablue.
Mechanical filtration
Since I have these two huge sumps - each 300L in capacity, most of the mechanical filtration is via settlement in the sump. I have no other direct mechanical filtration in the system.
Chemical filtration
I run a tiny Phosban 150 reactor in the sump filled with GAC. Originally I used this to help clear the water, but now I run it to remove any chemicals my Leather coral might exude. This reactor is on 24/7 and is fed by a small Eheim pump. I also added a Phosban 150 reactor filled with 500g of RowaPhos to try and reduce my Phosphates.
Biological filtration
Since I learnt my lesson with reactors, this time I opted to use about 90kg of live rock, a 350kg DSB as well as Chaeto growing in the sump to help with biological filtration. It has been one month since I started the tank (at the time of this writing) and I can already see the tiny microfauna settling in the DSB. The chaeto is growing very well, and since the 90kg of live rock are fully cured this ought to be enough.
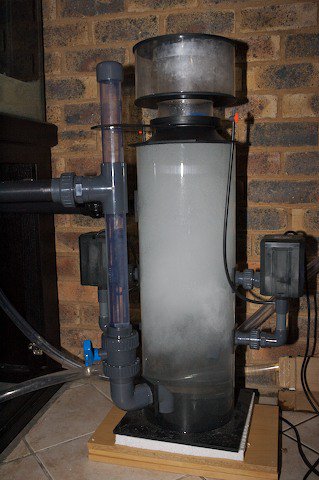
As predatory fish generates huge amounts of wastes, I have purchased a big Deltec AP902 skimmer to help remove DOC's before they break down and pollute the water. This skimmer works very efficiently. The picture on the right shows the skimmer when the tank was just filled with salt water.
The cup has a drain connector for connecting it to a remote bucket when you are on holiday. The skimmer itself is fed by two eheim pumps, and the long body makes this one highly efficient skimmer.
Heating/Cooling
To heat/cool 528g of total water volume is no easy task. In winter the inside temperature sometimes drop to as low as 5C, and since I keep my tank at 25.5C that means the heating equipment must be able to maintain that temperature difference of 20.5C, which is not easy. That is why I have four 300W Eheim Jagers installed in the sump. Once the temperature falls below 10C they cannot keep the temperature at 25.5C, but it usually does not drop below 24.5C. If it does, then the Aquatronica's alarm sensor would wake me and I'd enable the Hailea HC1000 in heating mode. With a combined 2400W of heating I can maintain the tank's temperature no matter what the ambient temperature is.
For cooling the Hailea HC1000 is set to cooling mode. Since I have built this tank during winter time the chiller has never come on yet, so I will have to wait for summer to raise any opinions.
Popular belief has it that a big mass of water like that cannot cool very quickly. Well, one night the ambient dropped to 10C and the power failed that night. The tank's temperature dropped from 25.5C to 23.5C in a matter of 3 hours. That is quickly...
Additives/Topup
I am using a Tunze Osmolator - identical to the one in my reef aquarium - for replacing evaporated water. The RO water is contained in a 150L (40g) glass tank that I painted black to keep the algae out. The pump is connected to a Tunze Kalkwasser Dispenser that allows me to supply kalkwasser with the evaporated water. The system evaporates about 8-12 litres per day.
Nothing else is dosed.
Return Pump
Since the tank is so big, I am using a Hailea 6850 pump which can manage 7000L/h and has a maximum head height of 5m. This is a fully submersed pump. 25mm inner diameter clear hose pipe is used to connect it to the chiller. This pump works well but is a bit noisy.
Flow
Initially I thought one Tunze Turbelle stream 6100 pump would suffice since I am not going to keep any LPS or SPS, however I was badly mistaken. Insufficient flow will cause Cyanobacteria to bloom and detritus to accumulate. So I now have two Tunze Turbelle Stream 6100 pumps to the left and right of the overflow box, and a powerful 6200 on the opposite side of the tank. The two 6100's are connected to the same multicontroller I use for my 145g reef aquarium, and is ramped up sequentially. This creates sort of an alternating gyro effect.
The 6200 only comes on once every 45 minutes, and stays on at maximum output for 1 minute. The idea is to simulate a surge on the reef - blowing detritus etc. from the rocks. In addition since I added this powerhead the leather coral opened up in about 8 hours time, as the powerful surges blew away the mucus layer. It also keeps the giant elephant ear mushroom clean of crushed coral.
Automation
Automation is once again handled by my Aquatronica system. The T5's are on a photoperiod of 09:00 - 21:00, and the metal halides on 10:00 - 20:00. The refugium is connected to a separate timer that switches it on at 18:00 and off at 09:00. Chiller and heaters are switched based on the temperature level.
Water Parameters
Parameters are checked with the same test kits as the 145g reef. Parameters I keep this aquarium at are:
Measured: 29 Sep 2007
| Parameter | Value |
|---|---|
| pH | 8.30 - 8.45 |
| Temperature | 27 - 28 C |
| Specific Gravity | 1.027 |
| Ammonia - NH3 | 0 mg/L |
| Nitrite - NO2- | 0.02 mg/L |
| Nitrate - NO3- | 0 mg/L |
| Calcium - Ca | 440 mg/L |
| Alkalinity | 6 dKH |
| Phosphate - PO4- | 0.045 mg/L |
| Magnesium - Mg | 1280 mg/L |
Feeding
I feed my wrasses and Foxface daily a mixture of frozen mysid, brine shrimp and vegetable matter with small krill instead of brine shrimp about once a week. The inverts, Lionfish and eels are fed once a week. The two green brittle star fish eat lancefish, mussel and krill. Lionfish loves lancefish, mussel, krill, squid, scallops and prawns (the kind you eat at a restaurant). The Bird wrasse will take a lancefish or krill whenever it gets a chance, and loves to eat mussel. My Zebra eel eats only krill, prawns and mussel. The Snowflake eats krill, prawns, mussel and especially lancefish.
The Tiger cowry and Chocolate chip starfish both love mussel.
Maintenance
Once every two weeks I'll scrape algae from the glass, and as needed blow of detritus from the live rock. RO water level is checked whenever I pass by and feel bored. The GAC is replaced once in 6 months, and the chaeto pruned whenever it gets too much. Whenever the top glass panels are starting to become visibly encrusted with salt I'll clean them. Probes are recalibrated once in three months. Once every two months I do a 12% water change with RO/DI water mixed to the correct specific gravity using Tropic Marine Pro Reef salt.
Backup
The same backup system I use for my 145g reef aquarium is used here. Refer to that section for more information.