145g Reef Aquarium
Back when I started this hobby in May 2006, I did not really know the difference between LPS, SPS, Soft Corals etc. Due to this my choice in equipment was very generic - in order to support the widest possible range of marine life so that I can defer my choices to a later date.
Obviously this is not the best way to start a reef aquarium, but that is how mine started, hence the equipment and decisions I made in building my aquarium reflects this.
This article explains my equipment, live stock and other life support required to run my reef aquarium, as well as motivations behind these decisions. My tank has been up and running for 1 year 1 month now, and I believe it is looking quite good. This article is to share my experiences - it is not an authoritative source of information - for that I refer you to one of several great books on the subject, such as "The Reef Aquarium" by Sprung and Delbeek.
At the end of the article you will understand how I created this aquarium.
Tank
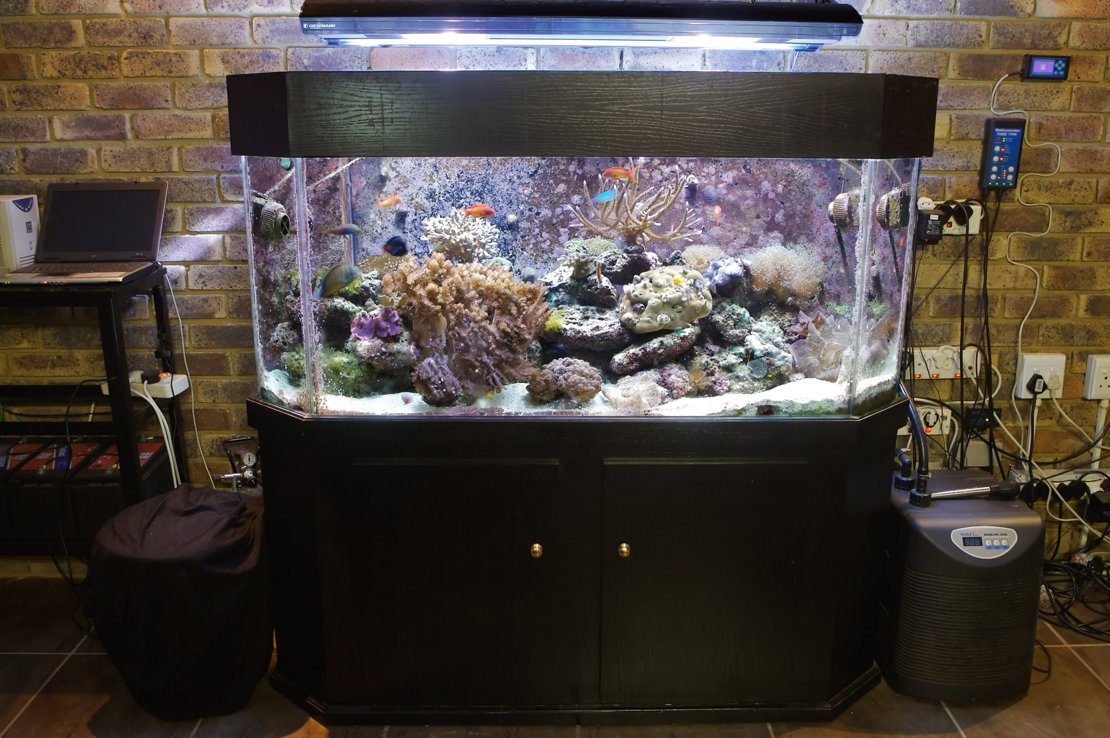
The tank is a custom build glass tank made from 10mm side panels and a 12mm base. The top has bracing bars to support the pressure of the water. Two sliding glass panels cover 95% of the top of the tank. This helps with fish that tends to jump. The tank is a panoramic design. Sometimes this is bad for photography, but the tank looks much more interesting this way. The tank measures 1.5m long, 0.6m wide and 0.65m high providing a total volume of roughly 550l, or 145g.
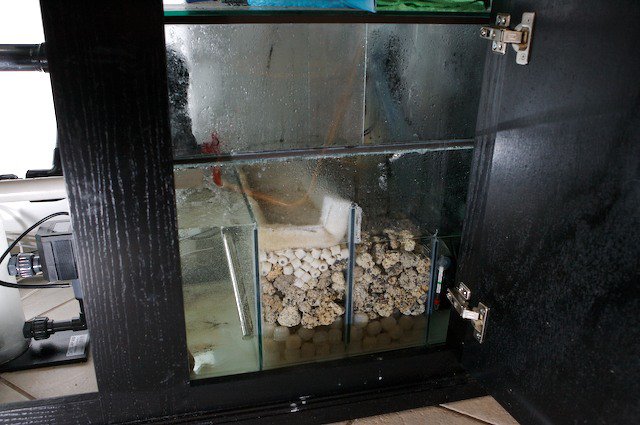
The stand is made from square metal tubing that has been coated with an anti-rusting agent. The black oak wooden frame is built around this steel frame, concealing it. Two small doors allow access to the sump located beneath. The sump consists of 3 sections - used originally for the bioballs and other filtration media. The skimmer, calcium reactor, kalkstirrer and some other equipment are all located underneath the tank.
The canopy is a closed lid design, housing the lights. The back of the canopy is open, allowing some air to pass in. So too is the whole back of the cabinet completely open, allowing fresh air to cool down the equipment and to mix with the water for oxygenation.
Between the tank and the steel frame is a 10mm sheet of polystyrene. This helps eliminate localised pressure points due to pieces of sand, stone and other hard granules.
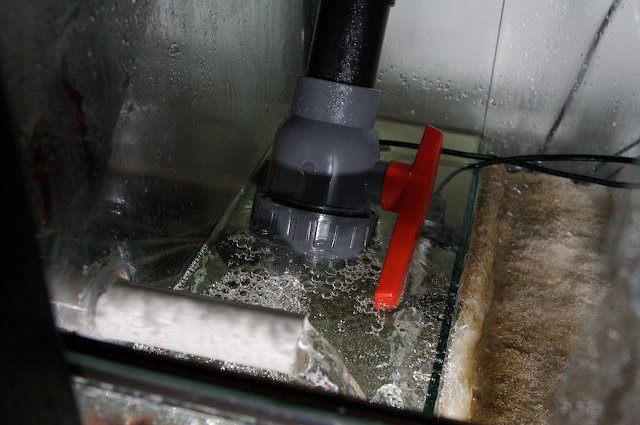
The back of the tank is painted with black quick drying enamel, giving it a professional look. In the left hand corner an overflow box performs surface skimming to help eliminate oils and other stuff gathering on the surface, impeding oxygenation of the water. The overflow box has a standpipe in it to help eliminate the waterfall sounds that would otherwise have occurred. Notice that I have not made use of a Durso standpipe simply because I was lazy. This would have further reduced the gurgling noises coming out of the overflow chamber.
The water falls through a bulkhead (tank connector) down to the skimmer and sump. The skimmer feeds the sump too. From there a powerhead pumps the water back to the main tank via clear hose pipe located to the right of the tank.
For details on terminology used, please refer to the Articles section.
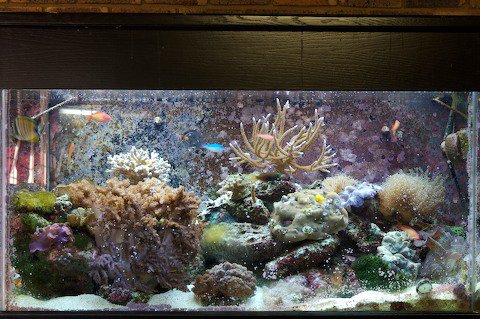
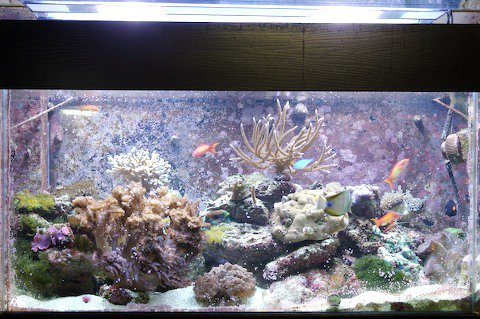
Some pictures are now in order.
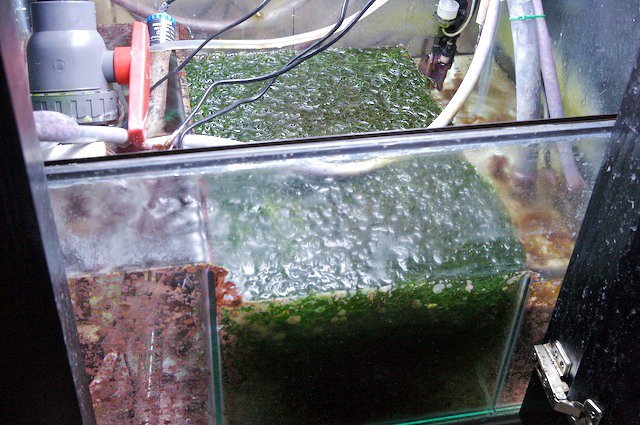
Deltec AP600 skimmer on left, filter sock on right with Rowaphos. I later learned that having Rowaphos in a nylon stocking like that is highly inefficient since the water will merely flow around the media, not through it.
Effluent from overflow chamber. The ball valve is to control the flow through the skimmer.
Originally the LFS sold me bioballs and ceramic noodles for biological filtration. I later learned that this is a very old and outdated setup, and discarded with it all together.
Those pictures were all from my initial setup. I will post all modifications at the end of this article and explain why.
Lights
My original lighting of 8 x T5 54W has just been replaced by a Giesemann Infinity panel containing 4 x T5 54W and 2 x 250W MH 13K. This pendant produces much more light than the 8 x T5 used to, as proved by a photograph taken before and after the upgrade. To the left is with the 8 x T5 54W, and on the right is the new pendant.
Mechanical Filtration
Originally I had filter floss packed in two layers on top of the ceramic noodles. This was supposed to catch detritus and other large, particulate matter where they could be easily removed. Since then I discarded all filter floss and biomedia. Instead I am using the sump as a natural settling place for detritus. It works pretty well too. The idea is that as water rushes in to the sump, the heavier detritus settles out on to the bottom of the sump, and the water is them pumped back to the main tank. No need for filter floss in a modern, Berlin style aquarium.
Chemical Filtration
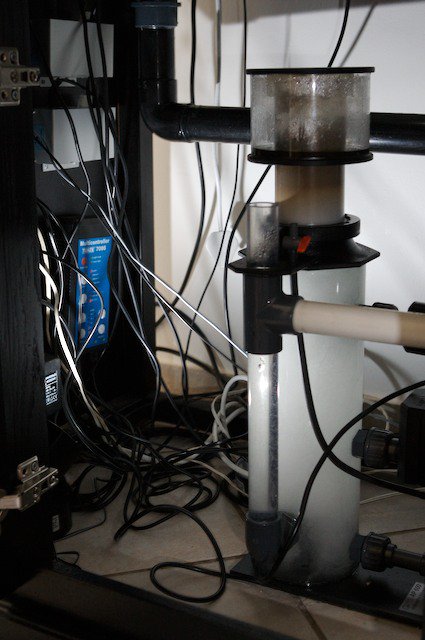
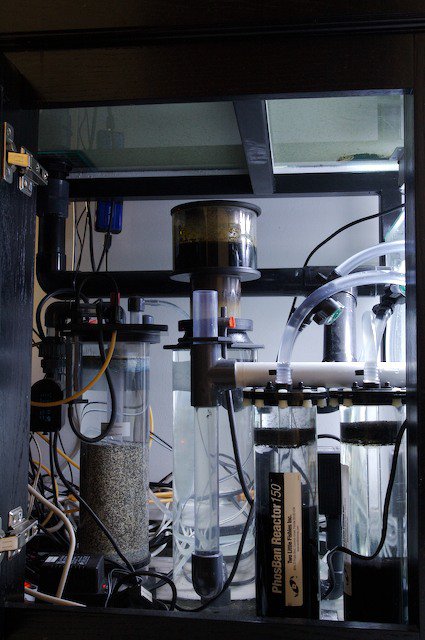
In the beginning I had no chemical filtration. Later-on as I added more and more corals I realised apart from keeping the water clean from yellowing substances, it is important to use GAC (Granular Activated Carbon) in order to remove harmful chemicals expelled by some soft corals such as Leather corals. I have been running GAC in a small Phosban 150 Fluidised Bed Reactor ever since I changed over to a Berlin system. The fluidised bed filter helps to force the water to flow evenly through all granules - dramatically increasing the effectiveness of the media. It is set to not flow very fast otherwise the media could be ground to a powder, and the effectiveness of GAC decreases with too fast flow.
The picture on the right displays the current setup, with the GAC and Rowphos now in small fluidised bed reactors.
Biological Filtration
As I mentioned, originally I used ceramic noodles, bioballs and weird lava rocks to provide an area for nitrifying bacteria to colonise. Little did I know the problem they would become lateron. For instance, they trap detritus very effectively, causing blockages and buildup of detritus. This increases Nitrates. Since the biomedia is highly oxygenated, there is no place for anaerobic bacteria hence no breakdown of Nitrate to Nitrogen gas can occur there, hence the buildup of Nitrates. One cannot clean the media as this will kill the bacteria. So the maintenance routine would be to regularly take out some of the media, rinse it in saltwarer and place it back. Since I am a very lazy person, this just did not work for me. So I removed all of this, broke down the little glass panel in the sump separating the biomedia, and instead replaced it with this (left).
I added some Chaetomorpha macro algae to the sump, added 2 x 24W T5 lights and converted it in to a small refugium. The idea behind this is to have the algae take up Phosphates and Nitrates, thus reducing these chemicals from the water. Furthermore, it is a great habitat for microfauna such as amphipods, copepods, mysis shrimp etc.
The rest of my biological filtration is handled by the 80kg of Live Rock I have in the display, as well as the 4cm aragonite sand bed. Together these are more than capable of handling the wastes produced by my current live stock.
A Deltec AP600 skimmer helps remove the DOC's before they break down.
Heating/Cooling
Heating is performed by two 300W Jager heaters by Eheim. I originally used some no name brand, and those were just plain horrible. Since I got the Jagers I never looked back. They are much stronger, much more reliable, more accurate (0.5C) and just vastly superior. I had to add a second one a month ago when it was really cold here. The single Jager could not maintain the temperature.
Cooling is performed by a Haelia HC500 chiller. This chiller works quite well, keeping the temperature in check in the summer. In the winter it never comes on. In the summer the heaters never come on. Since the lights are so close to the water level, that contributes greatly to the heat input in the tank.
Additives/Topup
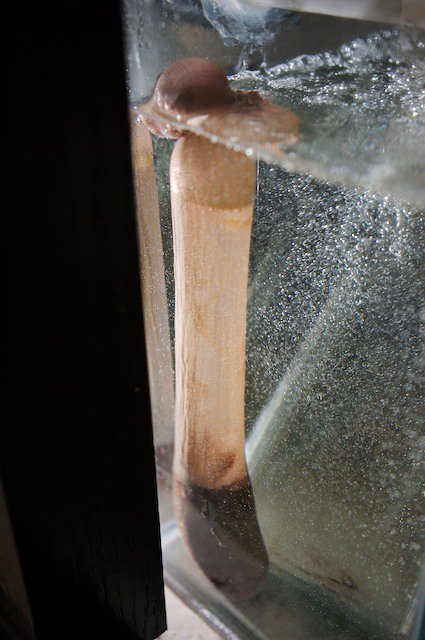
The topup system is a Tunze Osmolator, which uses a water level sensor to detect how high the water level is, and another safety shutoff sensor for when the pump gets stuck. This system works great. I fill a 37L bucket with RO/DI water once every two weeks, and the Tunze handles the topoff for me.
For Calcium and Alkalinity I use both a Deltec Kalkstirrer connected to the Tunze Osmolator as replacement water for evaporation, as well as a Deltec PF601 Calcium reactor. The Calcium reactor uses CO2 from a Tunze CO2 bottle connected via an electronic Tunze solenoid, a feed from the sump via a small eheim pump and produces a balanced calcium and alkalinity supplement to the tank at a drip rate of about 5 drops per second.
I never dose anything other than this and the occasional pH/Alkalinity buffer and Calcium additives when the balance is disturbed.
Return Pump
To get the water from the sump back to the main tank an Astro powerhead is used. It is rated at 2900L/h. The pump works OK, but it is not the best make one can find.
Flow
A reef tank cannot survive without adequate flow. Flow is more important that even light. Without proper water circulation, corals would all suffocate and starve, and fish will die due to lack of oxygen. For that simple reason I did not skimp when it came to choosing equipment for creating flow in the display tank. Two Tunze Turbell Stream 6100 pumps are at opposite ends of the tank, creating a gyro in the water column around the live rock. These Tunze's are connected to a multi-controller that allows one to create more chaotic flow patterns. The other cool thing is that the transformers are located outside of the tank, reducing the size they take up in the display as well as reducing heat. And they only consume 17W each to create about 12000L/h of water flow.
Automation
Since I am a gadgeteer, I purchased an Aquatronica controller system for all my aquariums. The basic concept is that a small micro-controller controls plug bars, to which certain devices are connected. Furthermore, water parameter probes are connected to the plug bars as well, and are placed in the tank. Together it is possible to monitor certain water parameters - in my case temperature, pH and specific gravity, and based on certain conditions activate or deactivate certain plugs. One such program I have created allows me to stop the Calcium reactor's CO2 feed by powering down the CO2 solenoid whenever the pH falls below 7.8. Other programs turn the lights on and off at certain intervals. Currently the Actinic comes on at 07:30 - 22:00, two 54W T5's come on 08:30 - 21:30, and the quad T5 comes on at 09:00 - 21:00. The refugium is on a reverse photoperiod, from 18:00 to 09:00. The chiller and heaters are based on a program that activates either one depending on whether the temperature is higher or lower than 26C. This way both can never turn on simultaneously - a very bad scenario (read high electrical bill).
The aquatronica is connected to my Laptop, so it is possible for me to download water parameter graphs and interact with the system in a much more intuitive manner than the controller unit itself.
Water Parameters
Apart from pH, temperature and specific gravity which is always monitored continuously, I measure calcium and alkalinity monthly. I never test my ammonia or nitrites since they are always 0. Phosphate seems to be very low most of the time too. Once in a blue moon I'll test nitrates, but that is mostly under 5ppm.
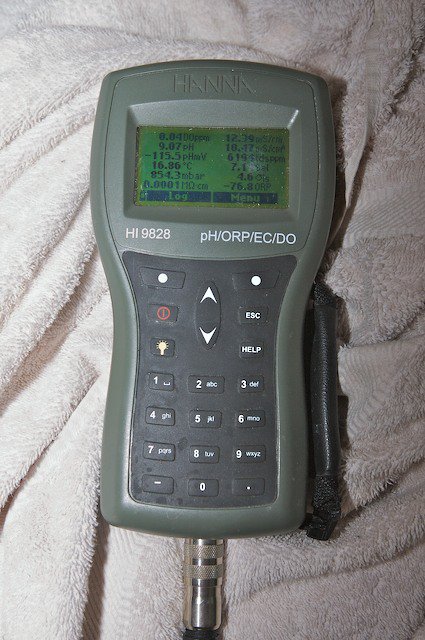
I use Tropic Marine test kits for Alkalinity, Calcium, Magnesium, Nitrite and Nitrate and D-Deltec/Merc high sensitivity Phosphate test kit. To confirm my temperature, pH and specific gravity readings and to test make up water, I use my Hanna HI9828 - an expensive but wonderful piece of equipment.
Parameters are checked with the same test kits as the 145g reef. Parameters I keep this aquarium at are:
Measured: 29 Sep 2007
| Parameter | Value |
|---|---|
| pH | 8.10 - 8.40 |
| Temperature | 27.0 - 28.0 C |
| Specific Gravity | 1.0250 |
| Ammonia - NH3 | 0 mg/L |
| Nitrite - NO2- | 0 mg/L |
| Nitrate - NO3- | 0 mg/L |
| Calcium - Ca | 360 mg/L |
| Alkalinity | 6 dKH |
| Phosphate - PO4- | 0.008 mg/L |
| Magnesium - Mg | 1350 mg/L |
The Calcium/Alkalinity levels are not optimal since I am still trying to find the right balance between the Calcium reactor and the speed at which the organisms in the tank uses it.
Feeding
I feed my fish daily with a mix of frozen mysid, krill and vegetable matter (sometimes I alternate brine, chopped mussel and lobster eggs). Once a week I'll add some Marine Snow or a mixture of Tropic Marine's Phyto and Zooplankton additions mixed with Cyclop-Eeze, Two little Fishies' ZoPlan and PhytoPlan. When I feed this I stop the return pump, skimmer and GAC reactor. After about 15 minutes I'll turn them back on.
Every second/third day I feed sushi nori to my tangs - alternating the green, red and purple types.
Maintenance
Maintenance consists of daily, weekly and irregular tasks. Daily tasks include checking on the drip rate of the calcium reactor, and checking the water level in the RO bucket. Once every two weeks I will scrape the glass clean of algae, pull out some bryopsis and if I remember, blow detritus off the rocks. Then for the irregular tasks. Once every couple of months I will replace the GAC/Rowaphos, topup the Calcium reactor's media, add more kalkwasser to the stirrer, clean and re-calibrate the probes, clean the top glass panes for better light penetration, scrape off coralline algae using a stanley blade, clean pumps/equipment and so on.
Once every two months I perform a 20% water change with RO/DI water mixed to the correct specific gravity using Tropic Marine Pro Reef salt.
Backup
Every reef aquarium should have a proper backup plan. After I had a power outage that took the lives of two of my fish and nearly killed my inverts and coral, I swore I'd get a proper backup solution.

I evaluated several different solutions, but decided on this. It is a line interactive, pure sinewave 2000VA UPS capable of carrying a 1200W load. It has five 102A, 12V batteries that is good enough to carry all three my tanks for 4 hours, excluding heaters, lights and chillers.
Since it automatically switches over to battery backup in the event of power failure, I do not have to intervene.
In the unlikely scenario that a power outage lasts longer than four hours, I have a 2.8KW Honda EU30is generator that can carry everything on my tanks for as long as I care to add petrol.
One particular aspect of this setup caused some problems however. The Aquatronica's plug bars need to be connected to the UPS, however lights, heaters and chillers cannot draw power from the UPS since it would overload it. The reason why the Aquatronica's plug bars need to be connected to the UPS is to support the controller while there is a power failure, so that water parameters can be monitored. The solution to this was easy. I connected DPDT relays capable of 10A @ 240V AC to each device. So the relay's coil is connected to the Aquatronica's plug bar, and the current from the mains are switched based on the state of the plug bar.